
Create a Pavlovia project
Important
As of December 27th 2025 you will need to have PsychoPy 2025.1.1 installed in order to sync to Pavlovia from PsychoPy. If you have an older version please see this guide on how to sync with Pavlovia independently of PsychoPy app.
Goal: Create a new project on Pavlovia to host your online experiment.
Before you start
You should already have:
An experiment prepared for online use
A Pavlovia account (https://pavlovia.org/)
What this step covers
In this step, you will:
Create a new project on Pavlovia
Sync your local experiment to the online repository
Understand version control basics for your experiment
Learn how to share your experiment with collaborators or make it public
Best practice for sharable and reusable projects
Create a new Pavlovia project
Ensure that you have a clean folder structure for your experiment, with all necessary files included. We recommend placing your .psyexp file and all associated resources (images, sounds, data files) in a dedicated folder in a location that is not already under version control.
Open your experiment in PsychoPy Builder.
Go to the “Pavlovia.org” menu → “User” → “Log into Pavlovia” and sign into your account.
Click the “Pavlovia.org” menu → “Sync” or the green “Sync” icon.
Give your project a name - do not use spaces of special characters. This will be the name of your project on Pavlovia.
You should now be able to find your experiment when you log into Pavlovia.org, under Dashboard → Experiments.
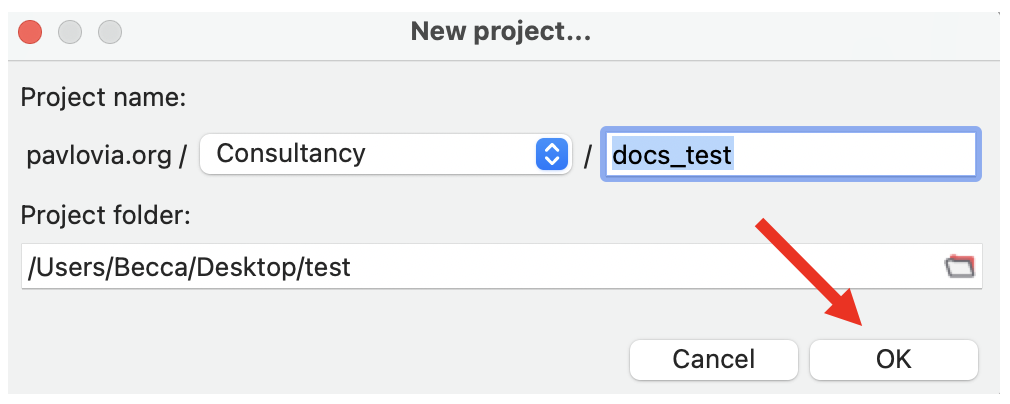
Fig. 19 Dialog box for uploading a new Pavlovia project from PsychoPy Builder.
Interacting with Pavlovia® from the Builder App
When running your study online, the relevant controls are in the Browser and Pavlovia sections of the ribbon:
From left to right:
The “Compile JS” button will write your experiment as a JavaScript (JS) file, which can run in a web browser.
The “Run JS” (green) or “Pilot JS” (orange) buttons will run your experiment in a web browser; via Pavlovia in running mode, or via a local debugging server in piloting mode. Note that, in order to run in Pavlovia, the project needs to be set to “running” on Pavlovia (not “piloting” or “inactive”).
The “Sync” button will synchronise the local files for your experiment with its online counterpart on Pavlovia.
The “User” panel is for managing your Pavlovia user - once you’re logged in, your name will appear in the panel (ToddOST in the image above). Click it to view your profile online, or click the drop down arrow to log in/out of Pavlovia in the PsychoPy app.
The “Project” panel is for managing the Pavlovia project associated with the current experiment, click it to view the experiment on Pavlovia or click the drop down menu to edit its details and search for other projects.
Updating your experiment
To make changes to your experiment you can make changes in PsychoPy Builder as normal. When you are ready to upload your changes to Pavlovia:
PsychoPy will prompt you to commit your experiment to the online repository.
Review the changes (number of files added/deleted), add a description of the change and click “Sync” to upload your files.
Version control basics
Every time you make a change locally, click Sync to update the online version, Pavlovia keeps track of versions automatically. This means that you can revert to previous versions if needed.
To view the version history of your experiment, log into Pavlovia.org, go to your experiment page and click on the “View Code” button. Here you can select “Repository” → “Commits” to see a list of all changes made to your experiment, and download previous versions if you wish. To reinstate a previous version, you will need to download the files, replace those in your existing local folder (keeping the same names) and re-upload them to your local experiment folder.
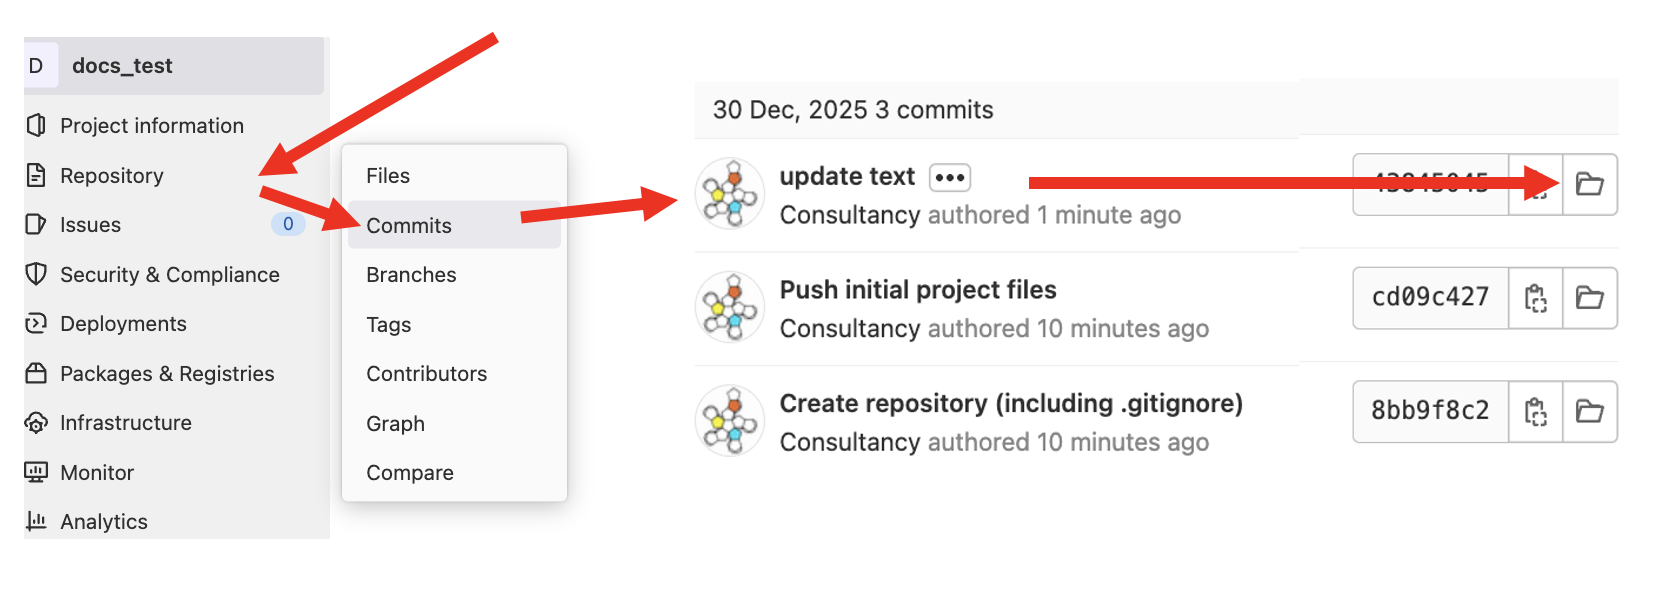
Fig. 20 Once you have selected “View Code”, navigate to the “Commits” tab to see the version history of your experiment.
Using GitLab groups for collaboration and sharing
GitLab groups allow multiple users to manage and collaborate on projects under a shared namespace. This is useful for labs or teams where several members may need to access, edit, or adapt the same experiments.
Why use groups?
Centralized organization: All lab projects can live in the same group.
Easy collaboration: Team members can fork, edit, or contribute without affecting the original repository.
Template management: You can maintain canonical experiments in a “lab group” and allow others to fork them for adaptation.
Example workflow
Create a group
On GitLab (accessible either via gitlab.pavlovia.org or though the “View Code” of a project), go to Menu → Groups → Create group.
Give your group a descriptive name (e.g., The Best Lab) and set the visibility (private or public).
Fork a project into the group
Navigate to an existing project (either your own or a template).
Click Fork and select your group as the target namespace.
The project now exists under the group and can be managed collaboratively.
Invite members to the group
Go to the group page → Group information → Members.
Invite lab members by username or email and assign appropriate roles (e.g., Developer, Maintainer).
Collaborators fork to their own account
Individual lab members can fork the group project into their personal account.
They can make edits, test changes, and optionally submit merge requests back to the group project.
Next step
Once your project is created and synced, continue to: