Using the Shelf for Multi-session testing, Counterbalancing and more online
PsychoPy Version 2022.2 or later required
Note: this is a new feature and currently in beta mode. Currently you can interact with the shelf through code components only. If you have feedback on use cases please share them !
The Shelf is a flexible, multiuse tool to aid with online studies where information needs sharing between studies, either in real time or across sessions. Use cases for the shelf include:
Here we will walk through some of the use cases and how to implement them. At the moment, we must interact with the Shelf through Code Components. In the longer term, once we better understand the ways in which scientists are using the Shelf, we hope to make this more accessible by making a Builder component.
Basic examples
You can access the Shelf in your Pavlovia.org account by selecting Dashboard > Shelf.
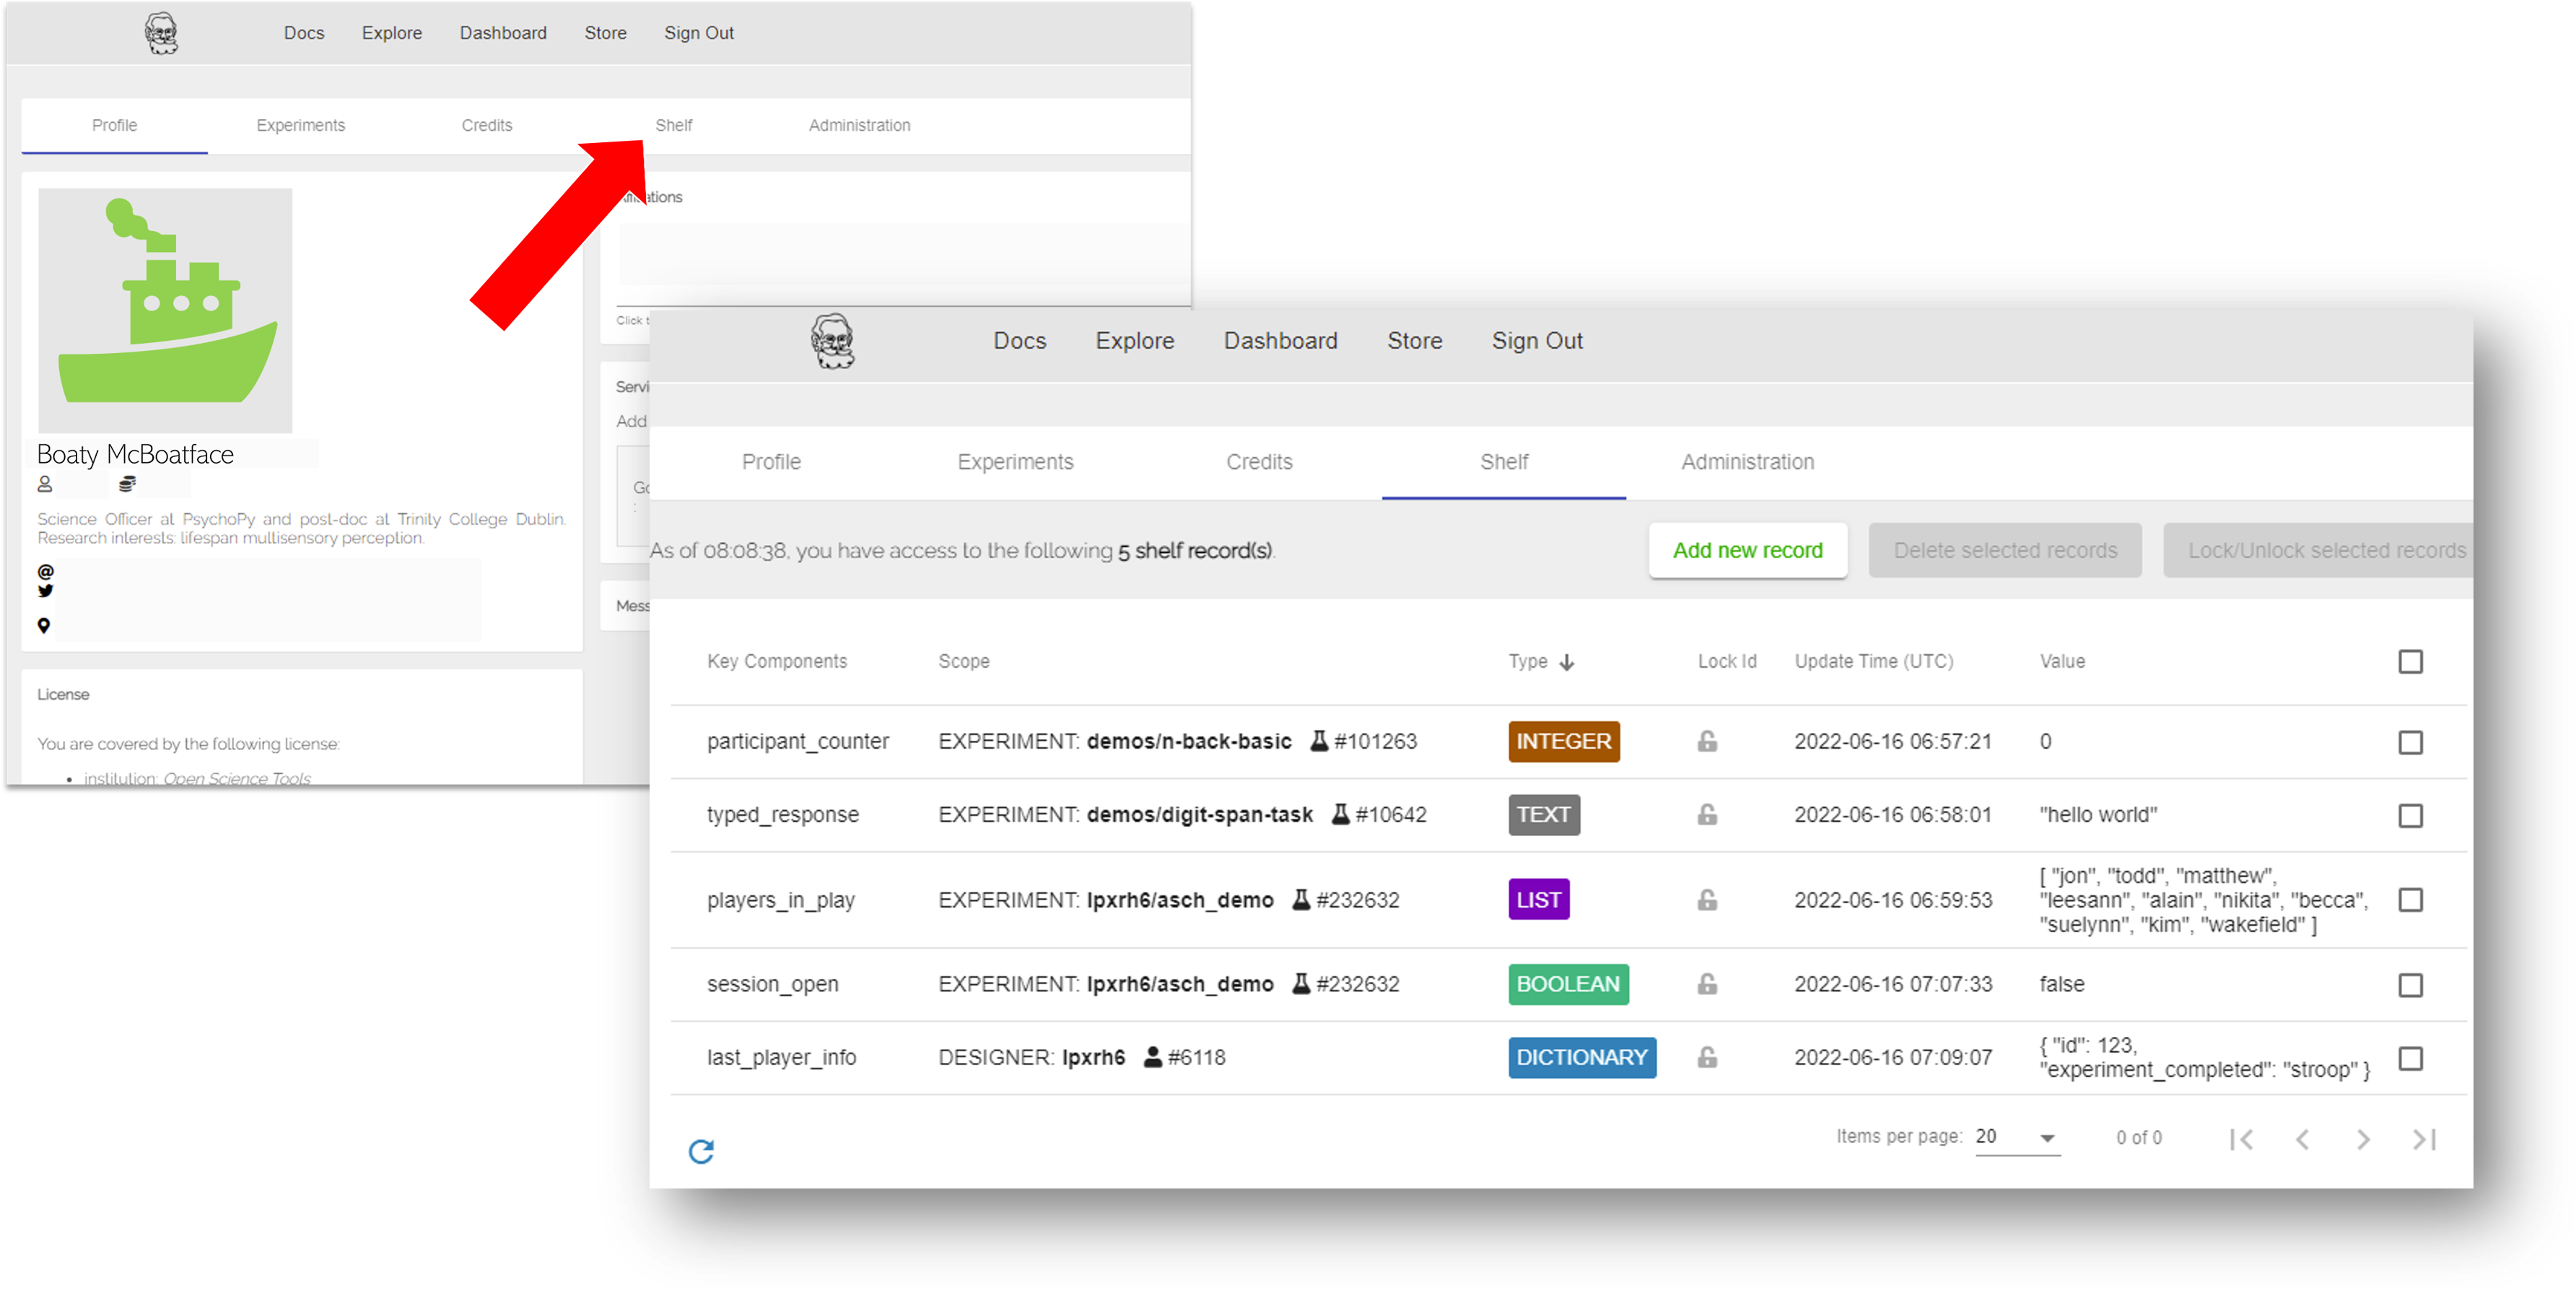
How to access the Shelf from your pavlovia.org account. To begin with your Shelf will be empty. The value of each Record is a Json format, so be careful when formatting (that means use double quotations rather than single quotations!).
You can then add one or several “Records” to your Shelf. Each Record can be one of several variable types; Integer, Boolean, Text, List or Dictionary. The type of Record you create is up to you and will depend on the type of experiment you are trying to create. Each Record can be made available either to a single Experiment or to the Designer, meaning this Record is available to all of your experiments (for instance if you would like several experiments to interact with one another). Each Record can also be unlocked, meaning it can be interacted with and edited by your experiments, or locked, meaning it is frozen and not open to further edits. The way in which you choose to use Shelf is flexible and up to you! but we walk through some guidance to get started below.
Interacting with Integer Records
Imagine the simple case of wanting to count how many participants have completed your task. You would make an Integer Record, which starts at 0 and assign the scope of the Record to the experiment of interest.
From within your experiment you can use several methods to interact with Integers including (though not limited to; see all methods here):
psychoJS.shelf.getIntegerValue()psychoJS.shelf.setIntegerValue()psychoJS.shelf.addIntegerValue()
We can therefore add a code component to our experiment, make the code component type JS and use psychoJS.shelf.addIntegerValue({key: ['participant_counter'], delta: 1}) where ["participant_counter"] corresponds to the key name of our Record, and 1 is the amount we wish to increment by. You might want to use this code snippet in the Begin Experiment tab if you want to increment your participant counter at the start of the experiment, or the End Experiment tab if you wish to increment at the end of the session. If we wanted to fetch the value we would use participantN = await psychoJS.shelf.getIntegerValue({key: ['participant_counter'], defaultValue: 0}) Note that it is important to use await this is because these functions are known and JavaScript Promises, and we must wait for the Promise to be fulfilled until we have the value to display.
Interacting with Boolean Records
Boolean Records are perhaps the easiest to interact with, by means that they only have two values (true or false, and therefore have a limited number of ways in which you interact with them. The most useful methods you may use when using Boolean Records are:
psychoJS.shelf.getBooleanValue()psychoJS.shelf.setBooleanValue()psychoJS.shelf.flipBooleanValue()
Imagine you have an experiment that can be “opened” or “closed” by a host. You could add a Record called “session_open”, ensure it is Boolean, and in your experiment make it such that the participant can sign in as a host (with the power to open/close the session) or as a participant (who, for now, passively watches the session opening or closing).
In our experiment we could get the session status and show it by adding a code component (ensure it’s code type is JS) and using psychoJS.shelf.getBooleanValue(["session_open"]). We can allow the host to open or close the session using a simple routine with a response component (in our demo we use a mouse) and in the End Routine tab using psychoJS.shelf.flipBooleanValue(["session_open"]). In a separate routine (the one the participant views) we might repeatedly check what the value of the “session_open” record is so that we can use it to control something in our experiment, in our case, a picture of a door that opens/closes.
Interacting with Text Records
Reading and writing Text Records from the Shelf requires two main functions:
psychoJS.shelf.getTextValue()psychoJS.shelf.setTextValue()
Quite simply - we use these to check the text currently on the shelf and fetch it respectively!
Interacting with List Records
Imagine you have an experiment where you wish for many players to interact with one another. To start with, you might want a list of players and you might want all players who are signed in to be able to see other players screen names. To achieve this, you would add Record to your Shelf and set the type to List. When interacting with this Record from your experiment, the main functions of interest are:
psychoJS.shelf.getListValue()psychoJS.shelf.setListValue()psychoJS.shelf.appendListValue()psychoJS.shelf.popListValue()
First imagine you want to allow the player to clear the list of preexisting players (in our demo we achieve this though a drop down). We would do that using psychoJS.shelf.setListValue({key: ["player_list"], value: []}). Then imagine we want to add this players screen name to the existing list of screen names, that is achieved using psychoJS.shelf.appendListValue({key: ["player_list"], elements: expInfo["screen name"]}) finally, to fetch the screen names (and we may wish to do this periodically) we can use players = await psychoJS.shelf.getListValue({key: ["player_list"], defaultValue:[]}) (remember, it is important to use await in order to retrieve the value once the JS Promise has been fulfilled.
Interacting with Dictionary Records
The main functions of interest for use with a Dictionary Record are:
psychoJS.shelf.setDictionaryFieldValue()- for either updating an existing Dictionary field or creating a new Dictionary field within the Dictionary Record.psychoJS.shelf.getDictionaryFieldValue()- for fetching the value associated with a specific Dictionary field
When you create a Dictionary Record, that dictionary is blank. Imagine we want to populate this with two things, a list of player names and a list of completed sessions (note, we could actually achieve this same thing through two List Records, but for this example we will stick to a single Dictionary). In our demo when a participant joins, we want to check how many times they have joined previously, and increment that to consider this session.
First, we check, has this participant taken part at all? We can do that by checking the existing fieldnames in our Dictionary Record existing_participants = await psychoJS.shelf.getDictionaryFieldNames({key: ["session_tracker"]}) (where “session_tracker” is the name of our Dictionary Record). Then, we check if this participant ID (retrieved from the startup gui) exists in existing_participants. If not, add this participant to the Dictionary, otherwise, increment the existing value associated with this participant:
if(!existing_participants.includes(expInfo['participant'])){
    psychoJS.shelf.setDictionaryFieldValue({key: ["session_tracker"], fieldName: expInfo['participant'], fieldValue :1})
    }else{
        //increase the number of sessions completed by this participant
        session_number = await psychoJS.shelf.getDictionaryFieldValue({key: ["session_tracker"], fieldName:expInfo['participant'], defaultValue:'no sessions detected'})
        session_number = session_number + 1
        console.log('session_number2', session_number)
        psychoJS.shelf.setDictionaryFieldValue({key: ["session_tracker"], fieldName: expInfo['participant'], fieldValue :session_number})
    }
Note
Remember to watch the capitalisation of functions when interacting with the shelf e.g. fieldName rather than fieldname .
Counterbalancing
PsychoPy Version 2024.1 or later required
We now have a Counterbalance Routine where you can set up your counterbalance groups in Builder Mode and interact with the Shelf with the record type, Counterbalance.
To set up your Counterbalance Shelf, you would need to first upload your task to Pavlovia and set it to Pilot/Running Mode.
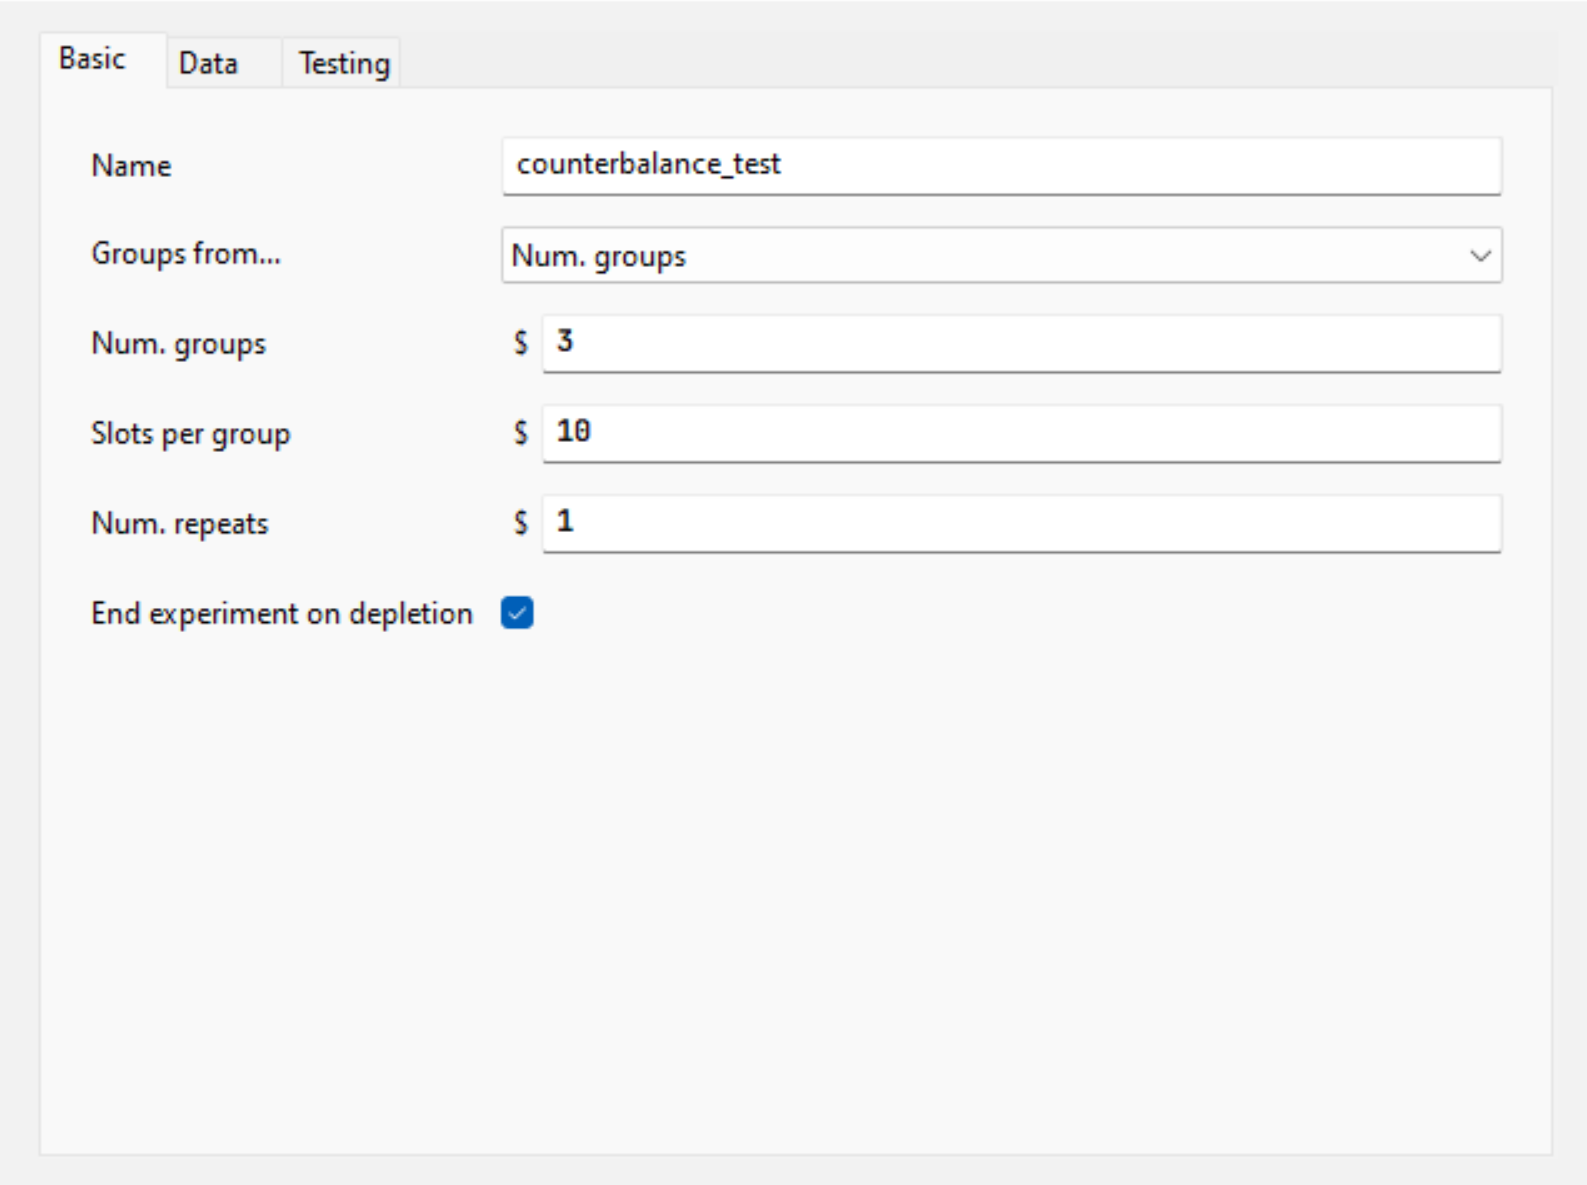
In your Shelf view of your Dashboard, click on Add Record. In Key, add the name of your Counterbalance Routine as in your Builder task. For Scope, choose Experiment and select the name of your Builder task. For Type, select Counterbalance (you might need to scroll down).
Once you click on Ok, you will see an empty table in Value. Here, set up the same group parameters as in your Builder task.
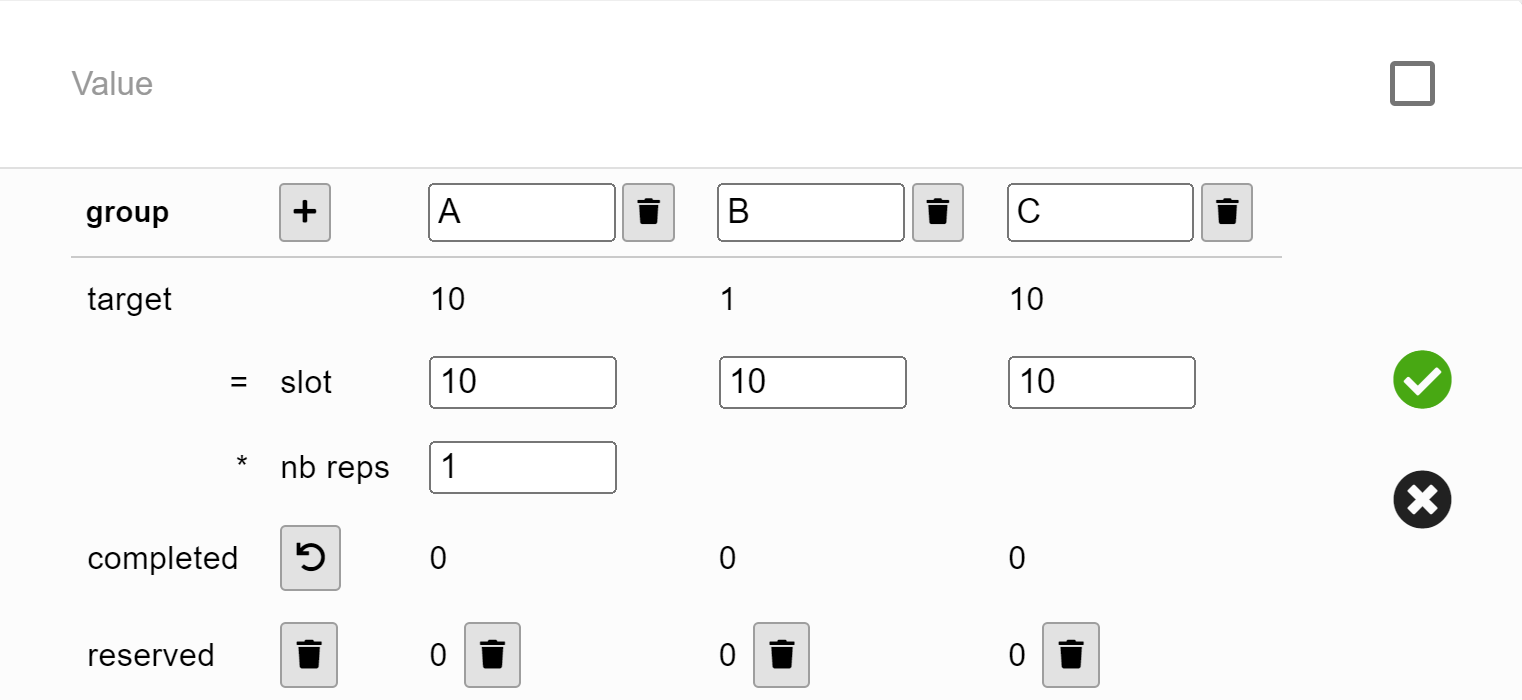
Your resulting Shelf record should look like this:

See also
Multiplayer experiments
Demo link (Note: Requires multiple browser windows or multiple people accessing the link at once!)
Using the shelf, you can create synchronous multi-participant experiments, i.e., multiplayer activities. First, two important notes:
The shelf is slow. It can take up to 60 seconds for an update from one participant to be received by another participant via updating and checking the shelf.
If you are planning to copy the demo, you will need to set up your own lists and dictionaries (described below) in your own account’s shelf.
Multiplayer activities first require a matchmaking routine to pair a participant with another participant (or, in principle, multiple other participants), and once the other player has been found, whatever communication is required by the task itself. This demo uses a very simple coordination game in which each player must select a red or green card, and both players win if they choose the same color.
The demo requires three entries on the shelf (which you will need to re-create on your own shelf if you want to create your own copy of the demo):
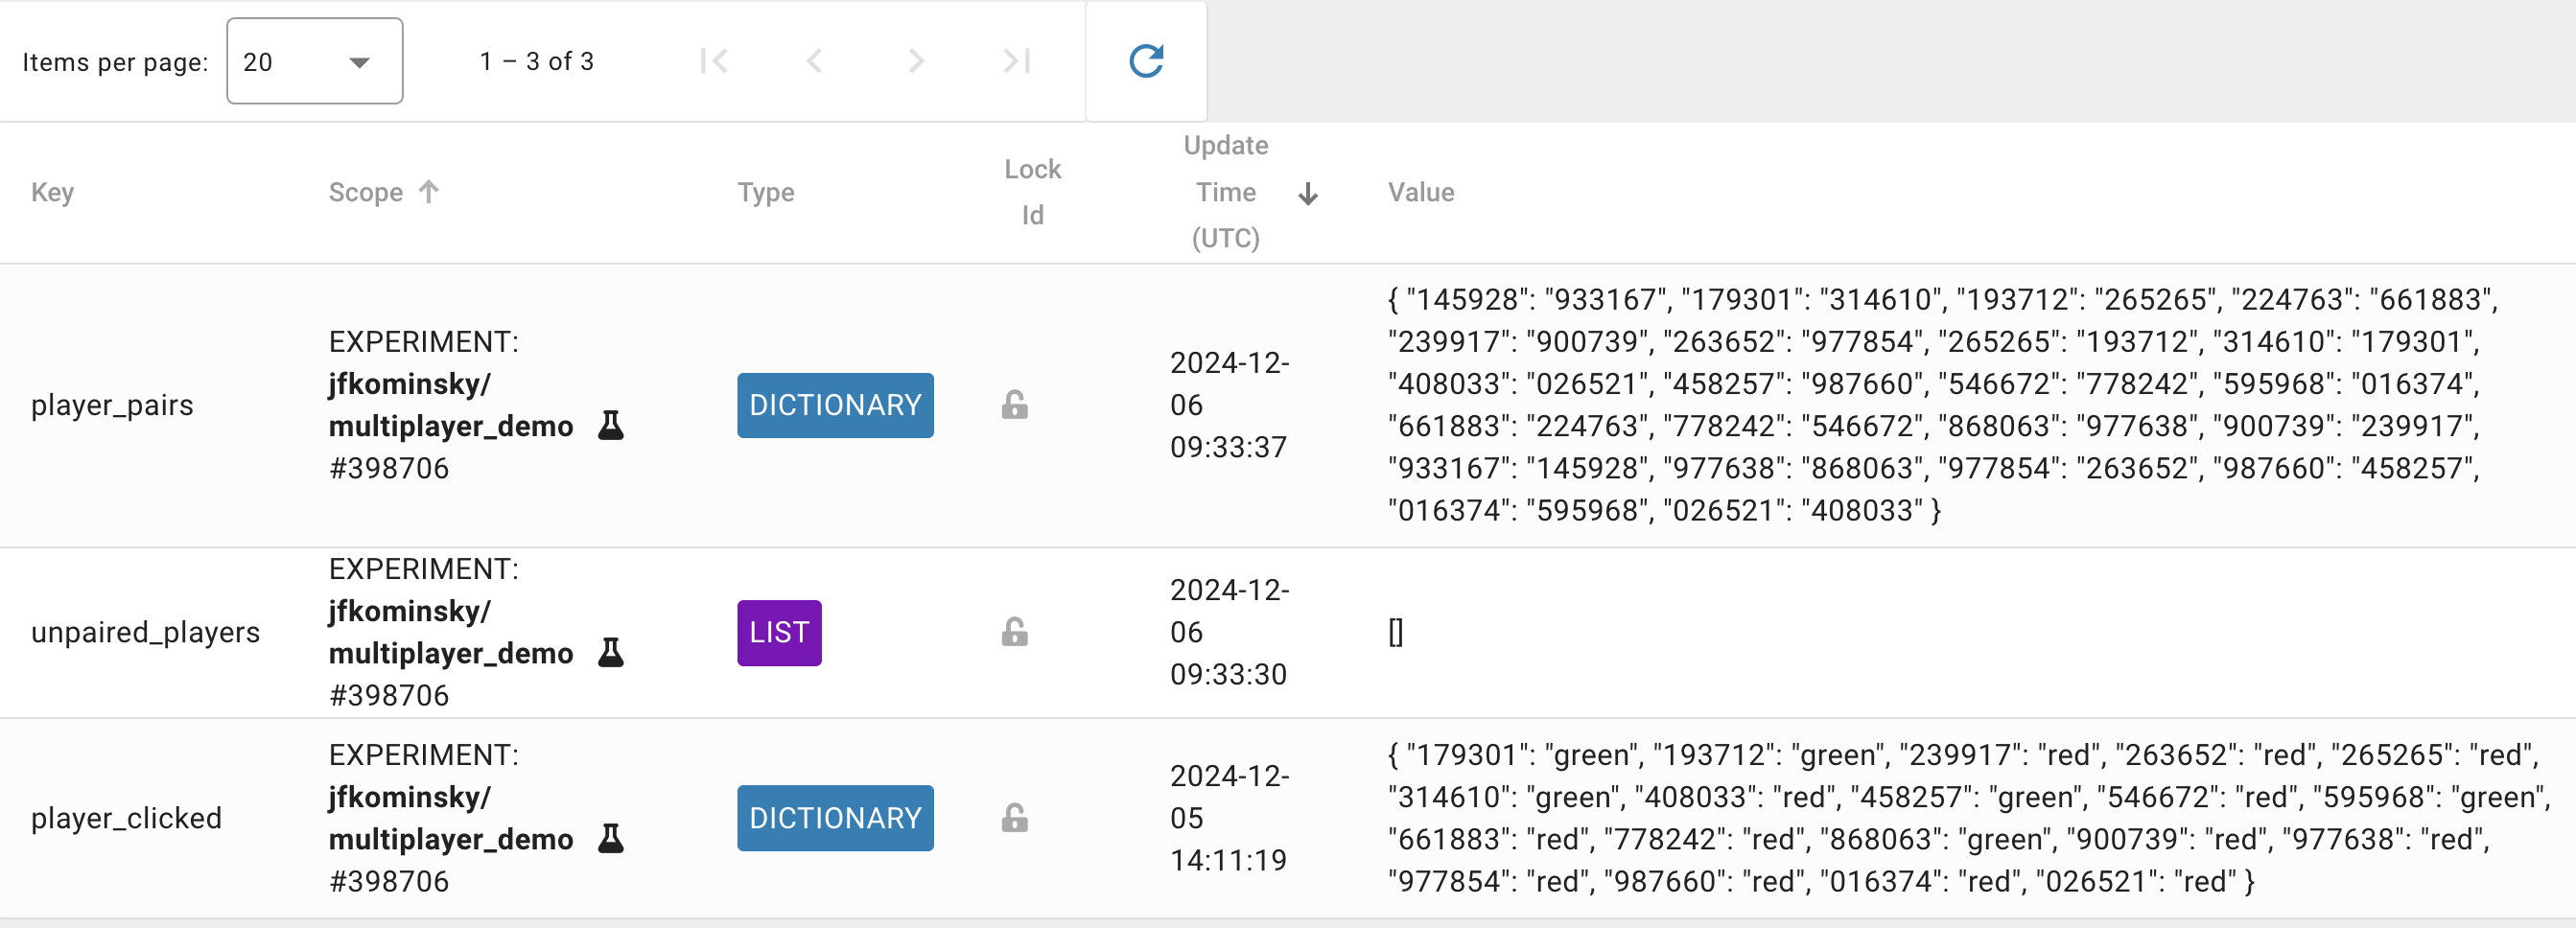
player_pairs: A dictionary consisting of key:value pairs where one player ID is the key and the partnered player is the value. This contains one key per player, so each pair has two entries in this dictionary. This keeps track of the matches once they have been made.unpaired_players: A list of Pavlovia IDs for players who have not yet been matched up.player_clicked: A dictionary consisting of key:value pairs where one player ID is the key and the color that player clicked (red or green) is the value.
The experiment starts with a matchmaking routine. This routine displays a message to the participant to let them know that matchmaking is happening, a timer to show them that the experiment is not frozen, and a code component that conducts matchmaking in three repeating steps:
Check if the current player’s Pavlovia ID is already present as a key in the
player_pairsdictionary. If so, record the value of that entry as the partner ID.
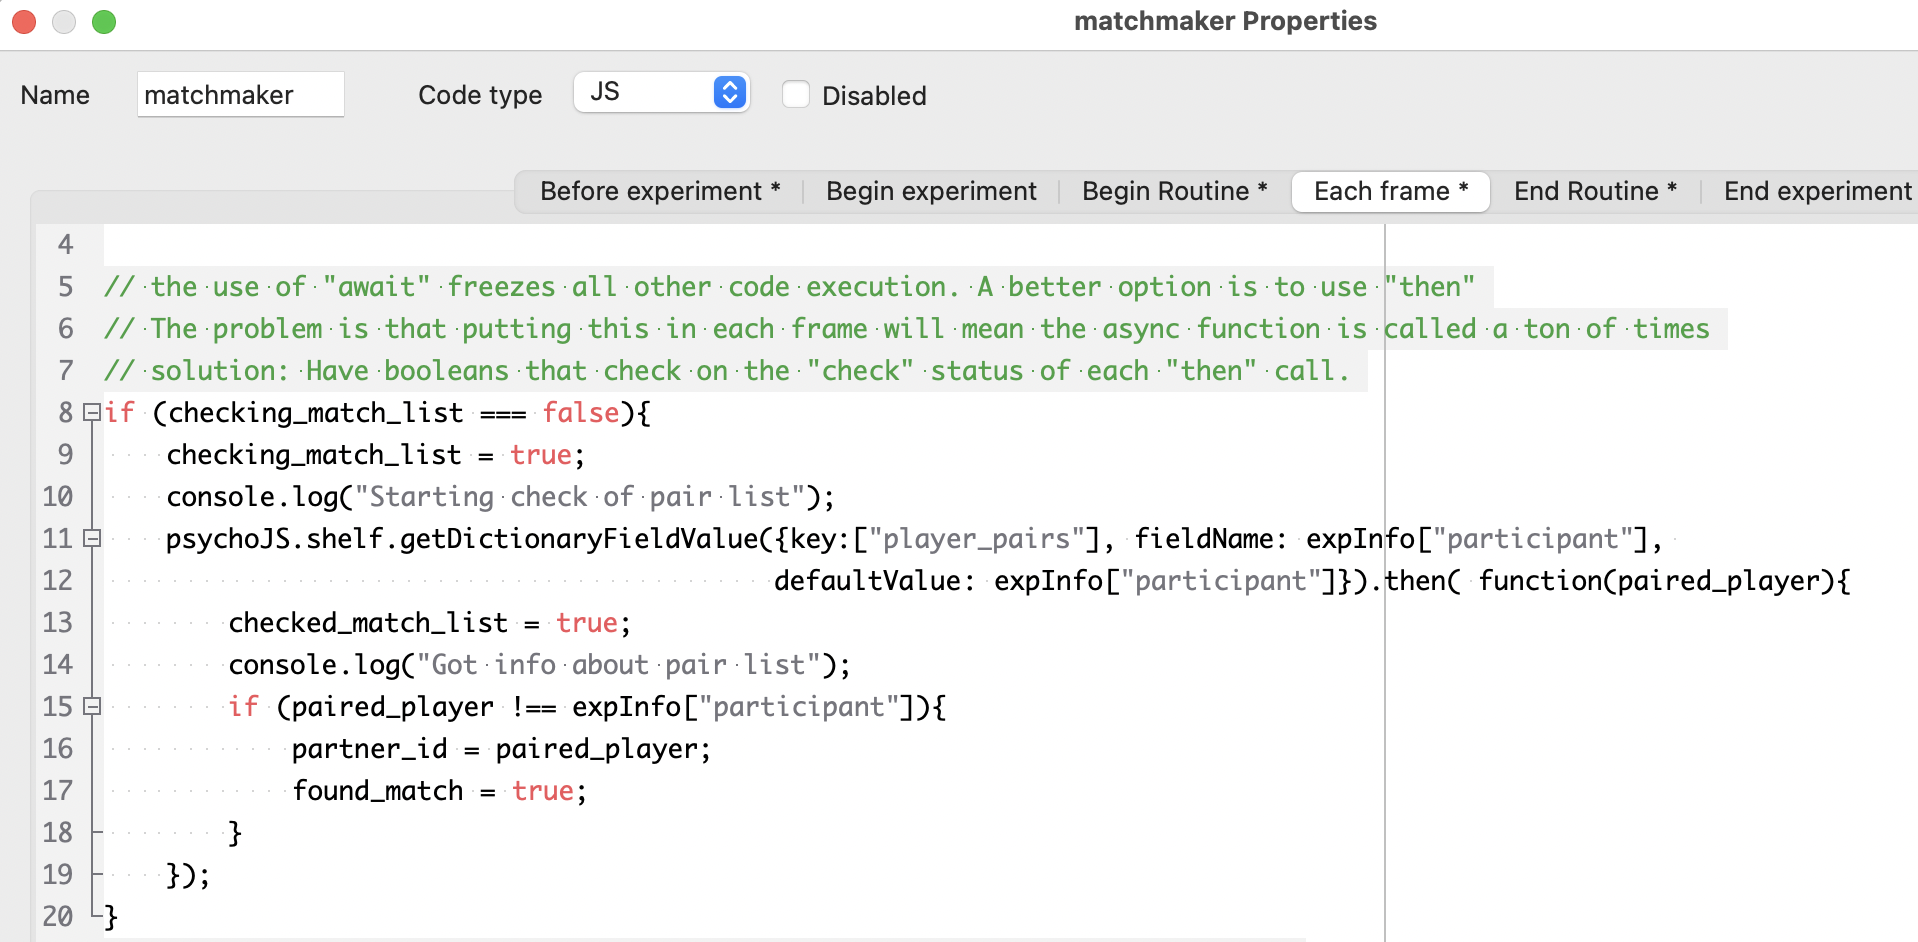
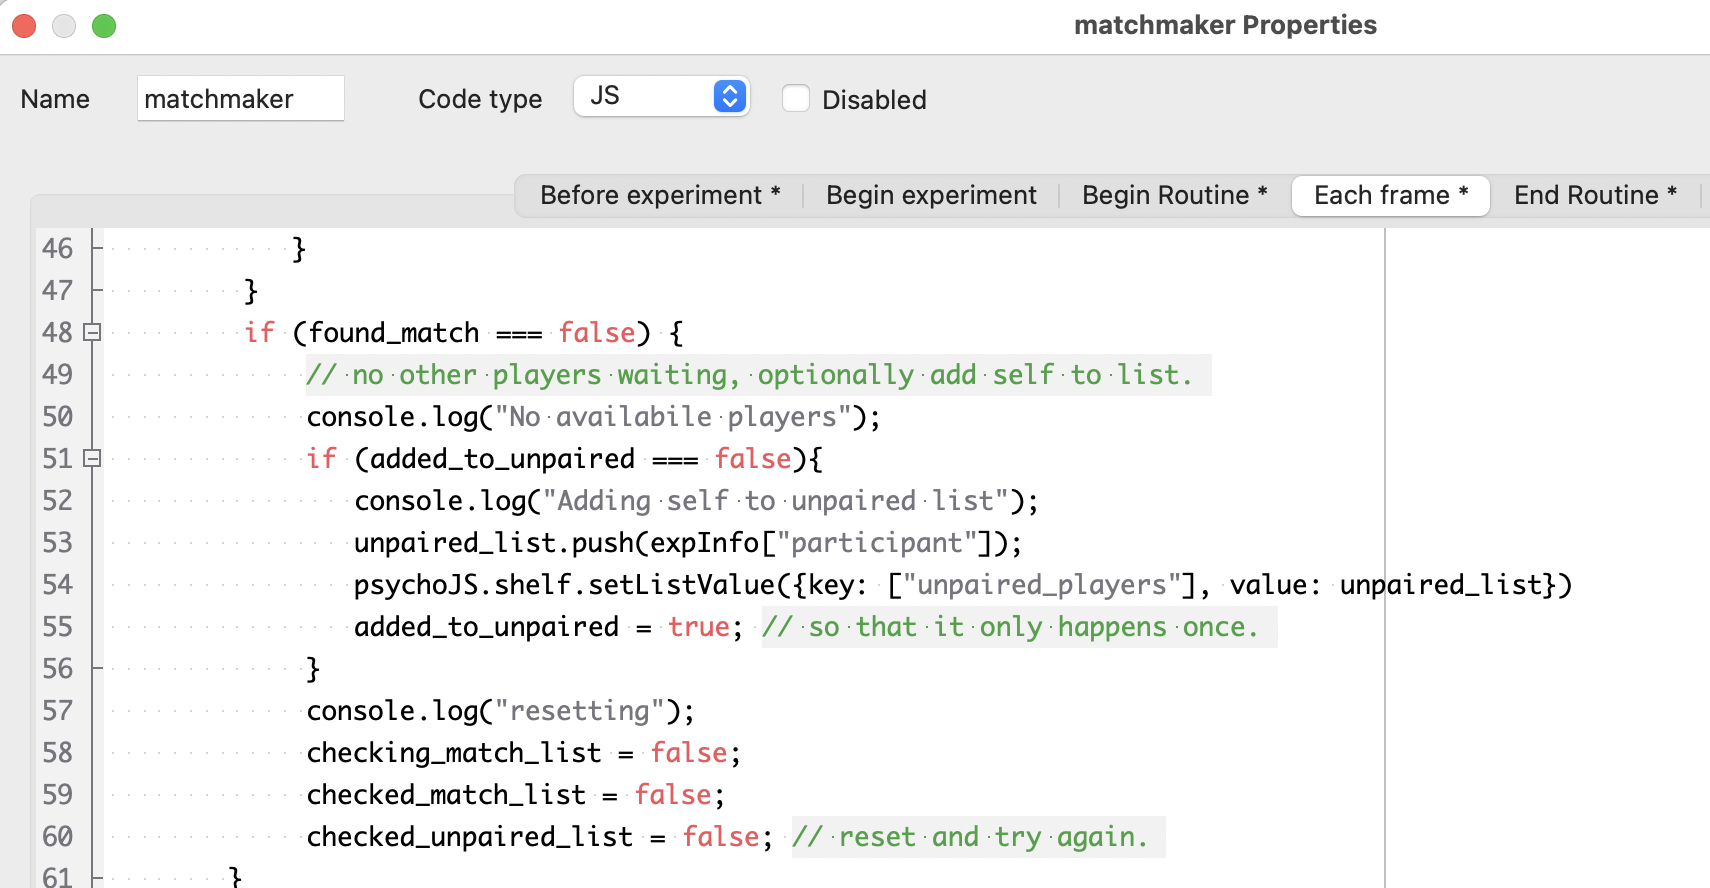
If the current player’s Pavlovia ID is not a key in the
player_pairsdictionary, check theunpaired_playerslist. If there is already an unpaired player listed, record them as the partner ID, remove them from theunpaired_playerslist, and add two matched entries toplayer_pairs, one for the current player and one for the partner.

If the
unpaired_playerslist is empty, add the current player’s ID to theunpaired_playerslist, and repeat from step 1.
To prevent the code from freezing every time it checks the shelf, this code uses .then(function(result){}) asynchronous code. The difference between this and the await keyword used with other shelf demos is that await freezes the rest of the experiment until the communication with the shelf is complete, whereas .then(function(result){}) executes when the communication is complete while letting the frame loop continue uninterrupted in the meantime. Note that in step 3, it uses neither of these, which means that the code does not know when the shelf has finished updating with the current player’s ID added to the unpaired player list. In this case that’s fine because nothing in this code depends on that completing, and there is a boolean that makes sure that the player’s ID is only added to the list once regardless of whether or not the update has finished from one frame to the next.
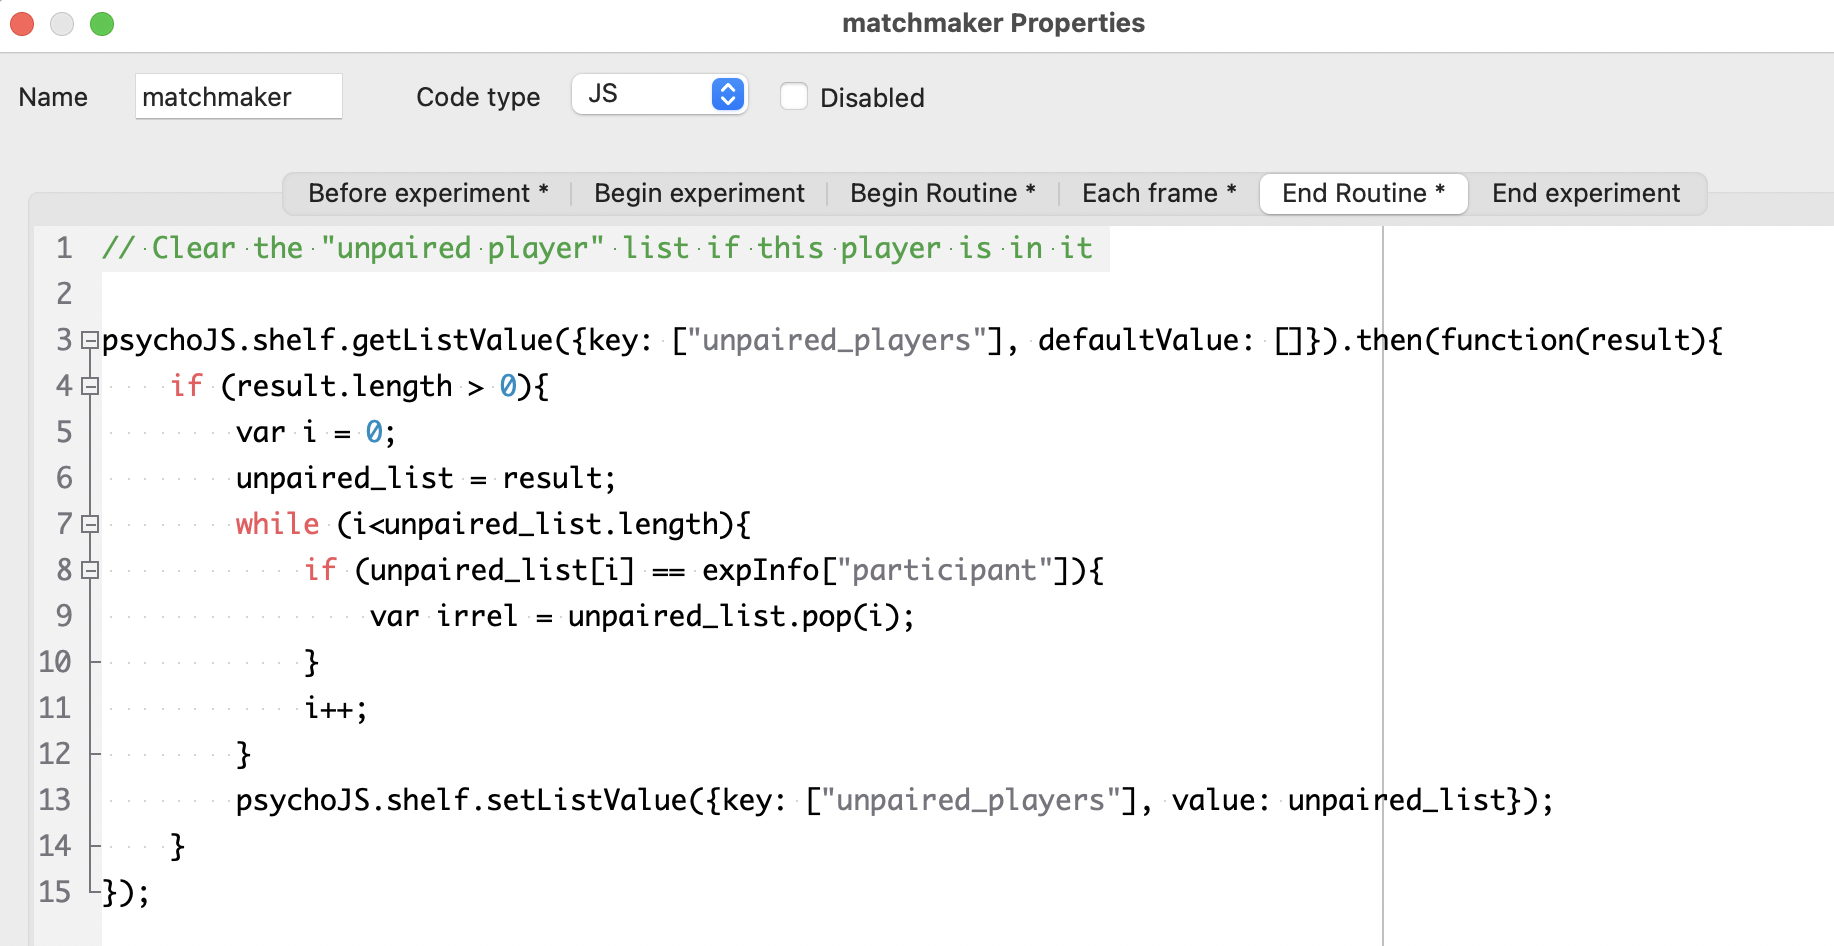
As a safety measure to ensure that the unpaired player list is cleared, the code component also includes an “end routine” step that makes sure the current player ID is removed from the list. Because it does not use await, this can happen while the experiment proceeds to the next routine.
After a partner has been found, the participant moves on to the coordination game, where they can click either the red or green card. Two black cards on the other side of the screen represent the partner’s cards. The code component in this routine does three things:
When the current player clicks a card, add an entry to the
player_clicked: dictionary with the current player’s ID as a key and the value equal to the color that the current player clicked.
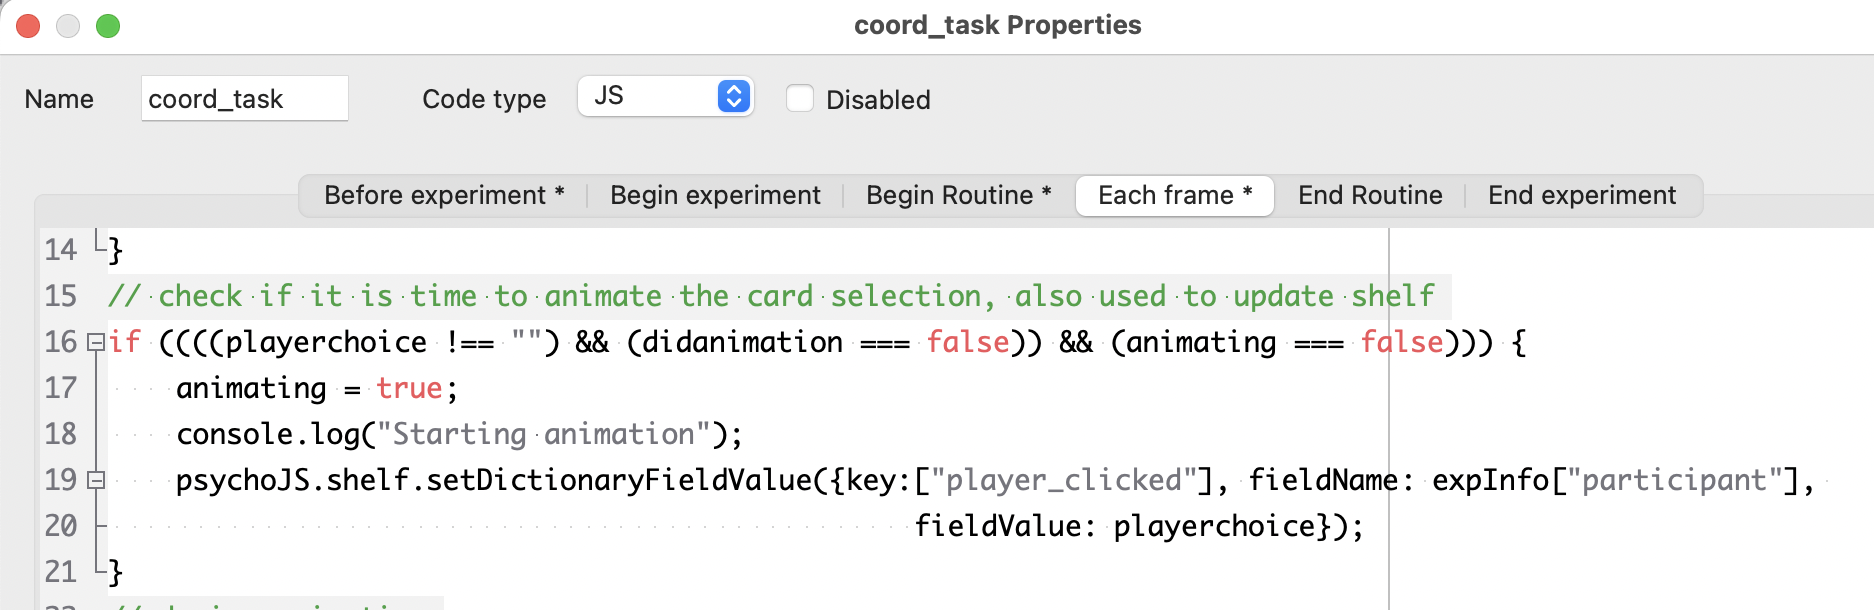
Check whether the partner ID has appeared as a key in the
player_clickeddictionary, and if so, animate one of the partner’s cards (always the left one) as moving toward the center (and record what color they actually chose in a separate variable).

When both (1) and (2) have occurred, end routine and go to the routine that presents the outcome.
The logic here once again uses .then(function(result){}) to make sure each player can make their own choice without the code freezing waiting for the other player’s choice.
Leaderboard
Leaderboards are a fun way of adding an element of gamification to your tasks! You can do this by using a Dictionary type shelf record. Just like in the counterbalancing example, the Key Component (on your Pavlovia shelf) and the key within the code component of your PsychoPy task needs to match and have a meaningful name. Since the demo task records both the reaction times and accuracy data, the name used is “leaderboard_scores”.
You would not need to add any fields within the shelf record on Pavlovia as they will automatically be populated when the task is completed. As more people complete the task, the shelf record would look like so:

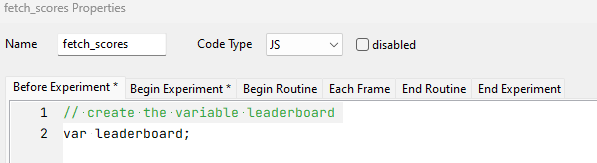
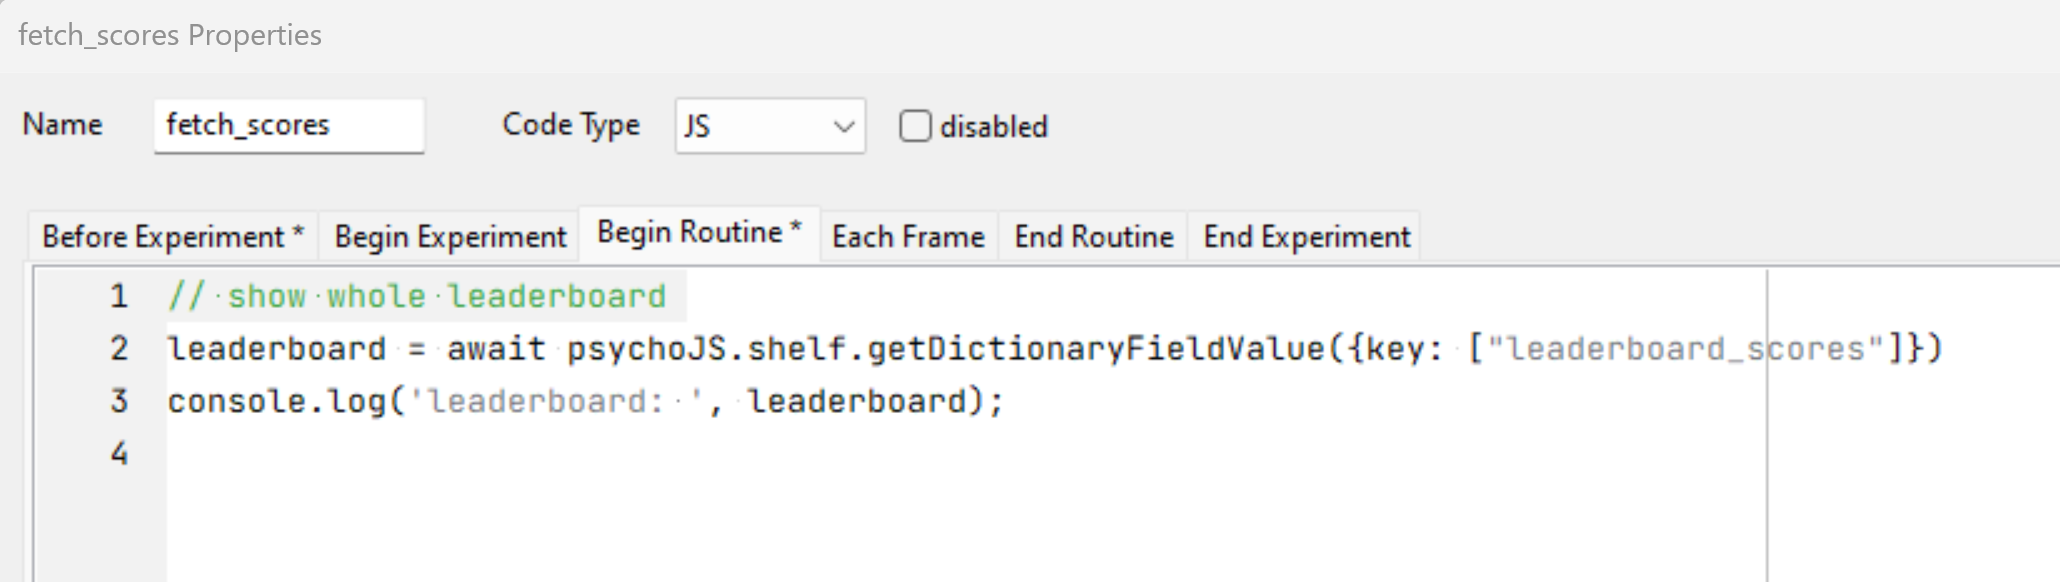
If you would like to just record each participants’ scores, you would only need the following code component:

This is how you would fetch all the records that’s stored within the leaderboard.
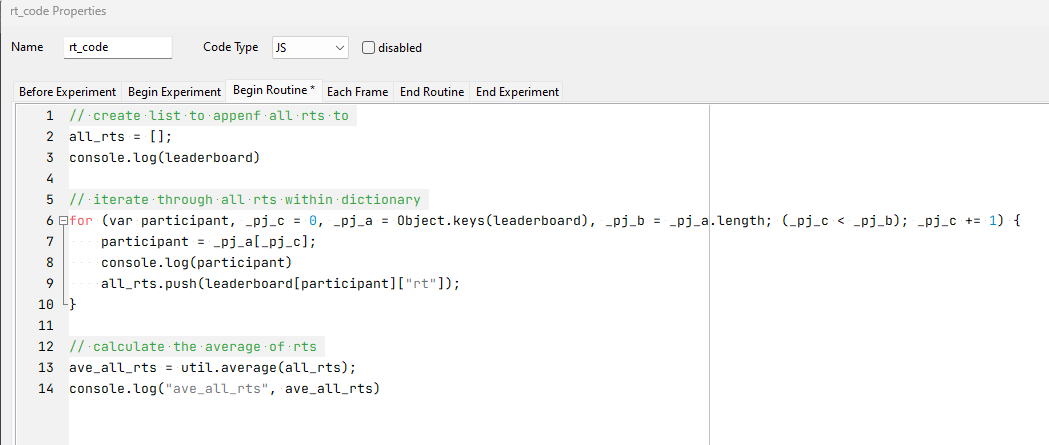
Average Reaction Times
This is an example JavaScript snippet to fetch all the reaction times recorded and calculate the average reaction times:
Ranked Accuracy
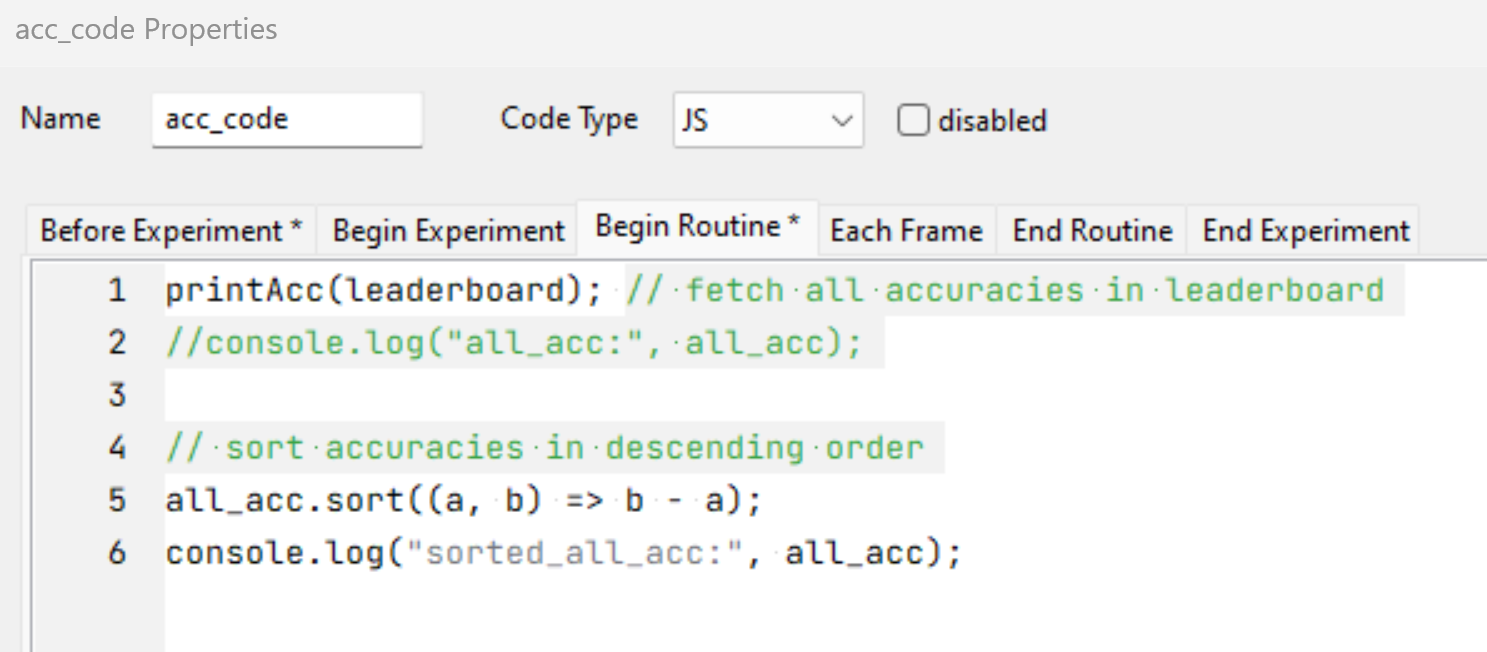
This is an example JavaScript snippet to fetch all the accuracy stored and sort them in descending order:
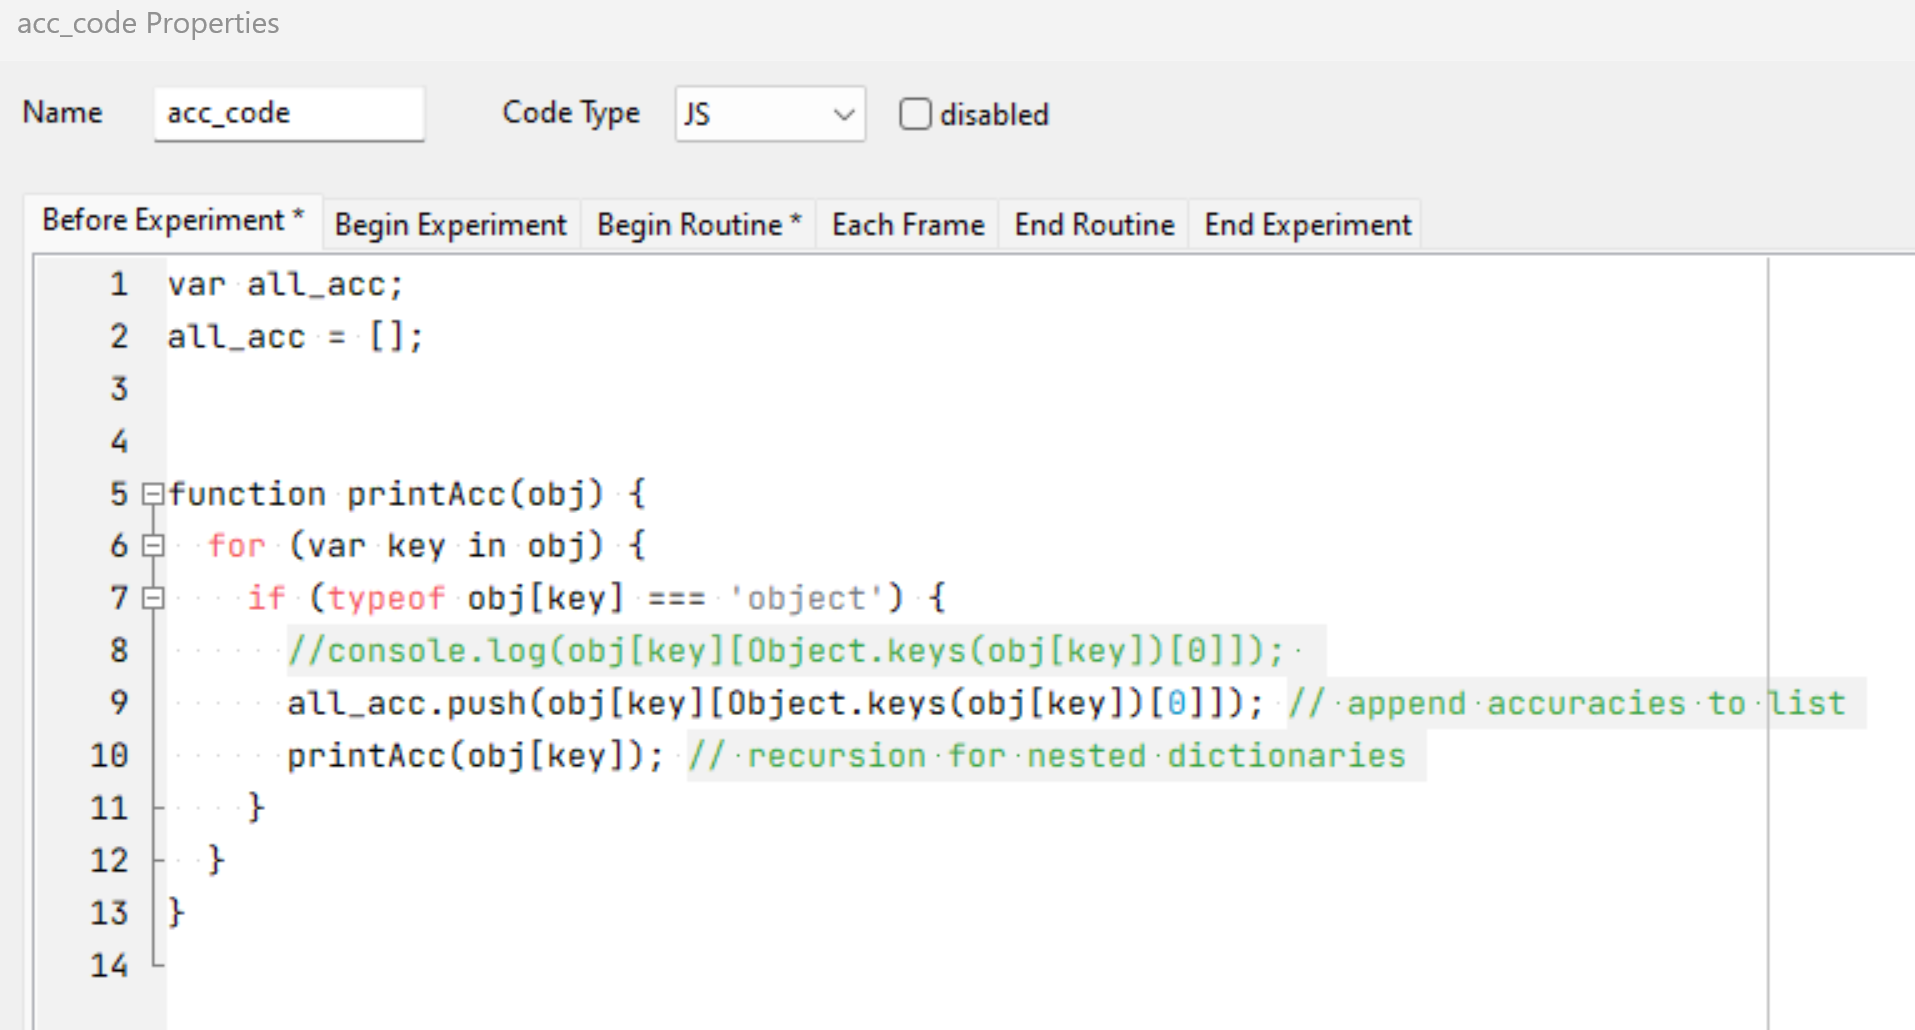
The above code component only sorts the accuracies of each participant but doesn’t return the participants’ IDs. To get the sorted IDs, you would need the following code component:
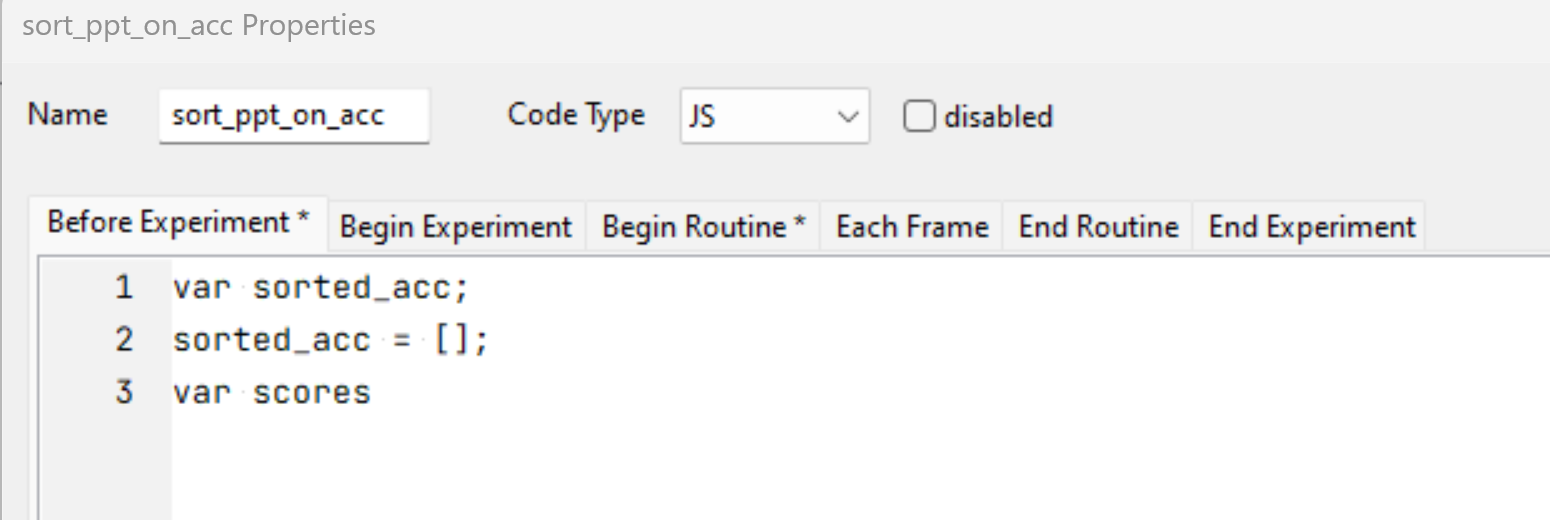
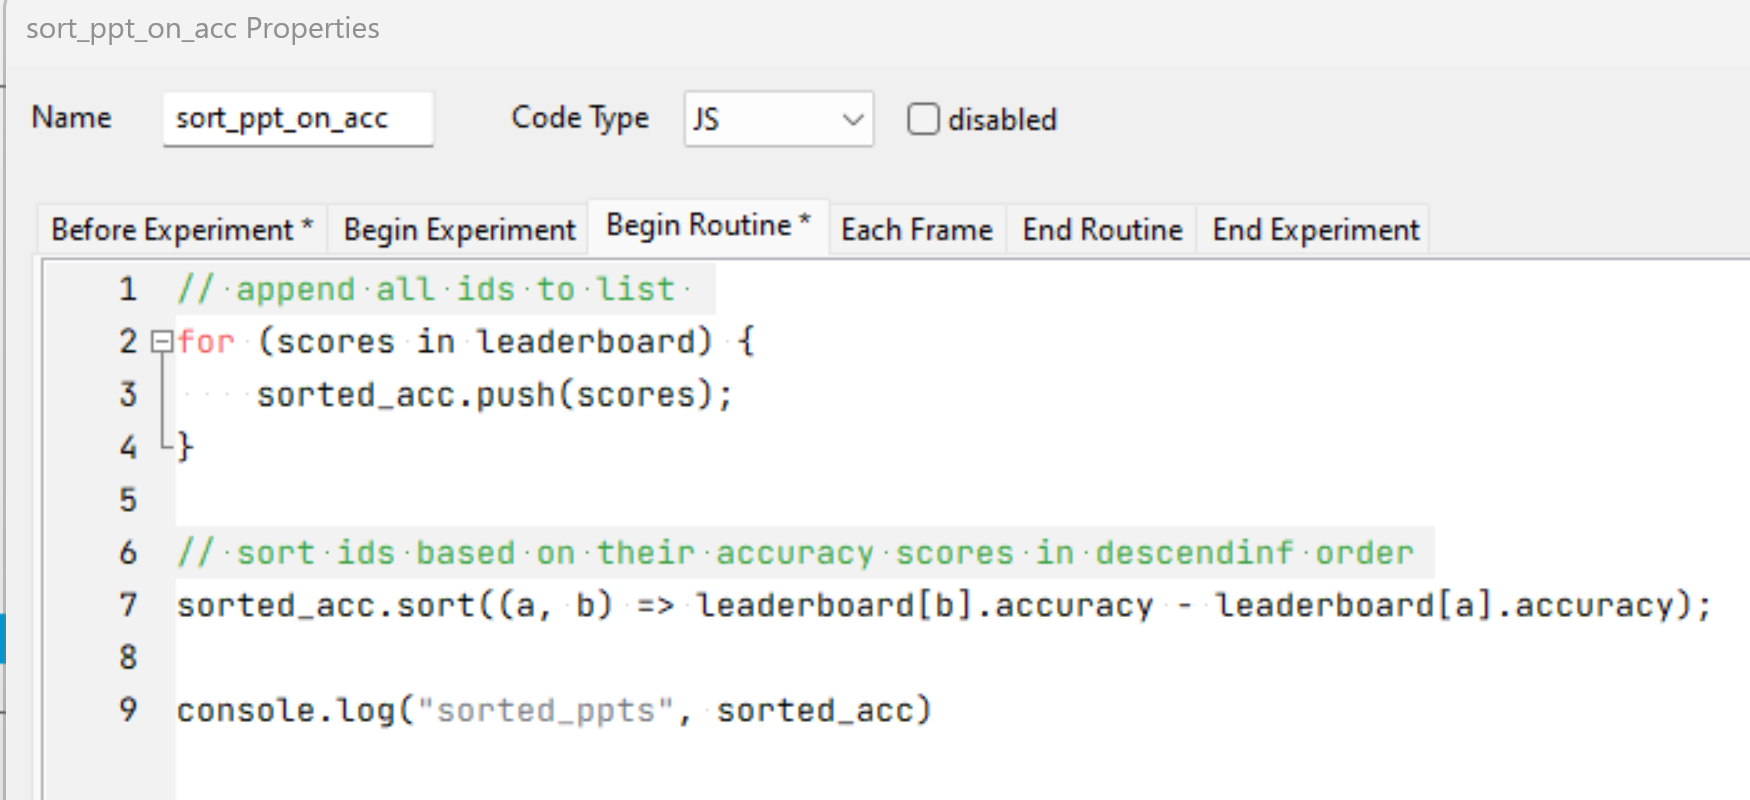
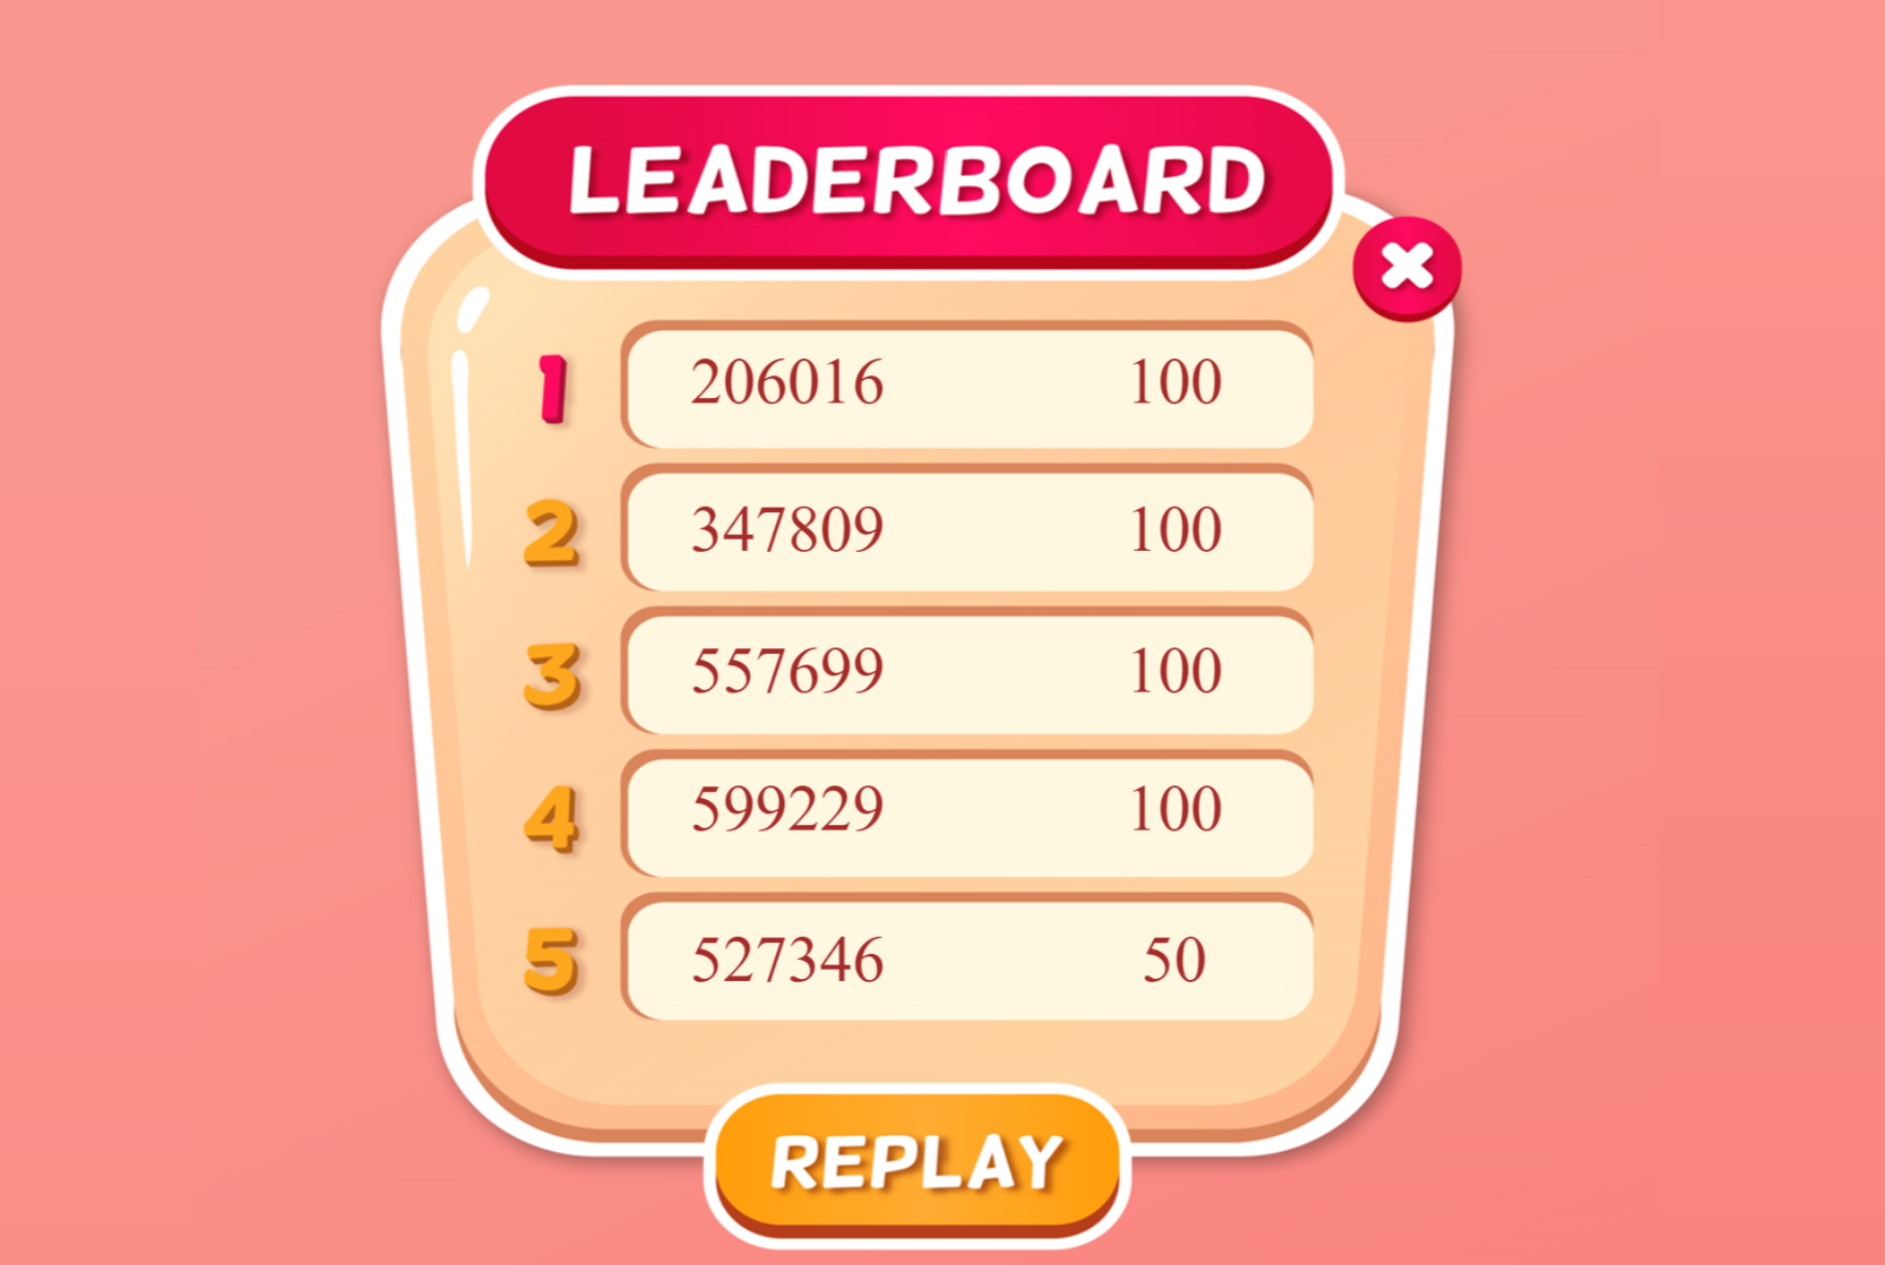
The IDs and accuracy scores are stored in the separate lists (in descending order) and therefore can be indexed. In this example, we index the first 5 IDs and accuracy scores.
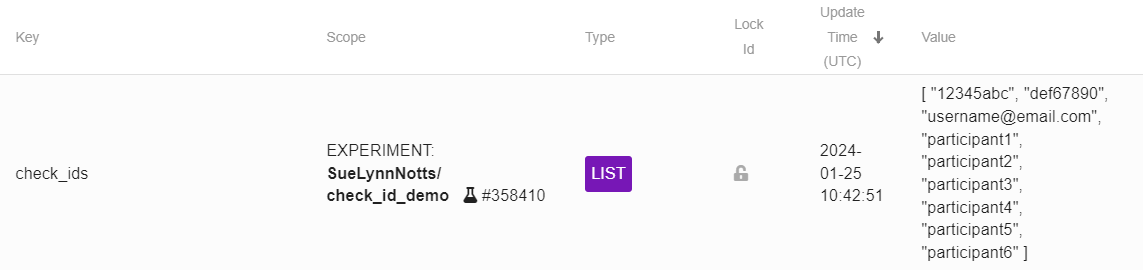
Checking existing participant IDs
When running multi-session experiments online, it is sometimes difficult to tell if the person accessing the link is a participant from a previous session. This participant ID checker using the List type Shelf uses a prepopulated list of IDs to first check if the participant ID entered at the startup dialog box exists in the prepopulated list (see list below for accepted IDs) before either showing a message saying “Welcome back!” or “Sorry, your id couldn’t be found.”

In the experiment files, there’s a spreadsheet which automatically formats the IDs to be copied into the Shelf record (see below for an example).