Resources in online studies
The loading of resources (images, sounds, movies etc.) in online experiments is necessarily different to the loading of resources in local studies (whatever the software package).
In a locally-executed experiment all the files that might be required by the study are already available on the computer. With an online experiment the HTML/JavaScript code needs to know what files in your project should be fetched from the server and sent to the participant ready for them to run the study.
PsychoPy/JS will try by default to Auto-detect files and download at the start, but sometimes you might still bump into an “Unknown Resource” error, and it’s good to know why these occur and how to approach them. PsychoPy/PsychoJS now provides multiple options for how to control what resources are loaded in your experiment and when:
Specifying “Additional Resources” (fine for not-too-many resources)
Specify the files to download at the start (e.g. fetch during instructions slides)
Specify the files to download each trial (e.g. fetch a single image during fixation)
Also, take note of the advice below on choosing and converting to appropriate media formats for your resources
Warning
Critically, you should note that you can combine Methods 2 and 3, explicitly specifying resources that need to be fetched both at the start and on each trial, but you CANNOT combine the automatic method (1) with the explicit methods (2 and 3).
Auto-detect files and download at the start
Example use case: if you don’t have a huge number of possible resources in your project then you could use this approach. The files will all download during the initial dialog, where participants input their details.
This is method requires no manual intervention, it is performed automatically. PsychoPy tries to work out what files you need in advance and codes these in to be fetched during the initial dialog box. To manage auto-detection, PsychoPy scans all your Components (e.g. Image Components, Sound Copmonents etc, and your conditions files) for signs of filenames that are being used and then adds those to a list of required resources for the study.
At times, PsychoPy won’t be able to detect that you need a particular image or other resource, because you’ve specified the filename using code. For instance you may list the image name as being “stim{N}.png”.format(thisNumber) but PsychoPy could never know what range of values thisNumber may take so it can’t know what filenames to look for. In these cases you can manually extend the list of files that will be fetched using the Extra Files setting in the Online tab of the Experiment Settings.
Specifying “Additional Resources”
Example use case: You don’t have that many resources (e.g. <200 pictures), but some of your resources might be specified through code or are conditional base on experimental group. The files will all download during the initial dialog, where participants input their details.
This is the only method of manually controlling resource loading that has been made easily available to users of PsychoPy prior to PsychoPy version 2022.1. If you don’t have that many resources (e.g. <200 pictures), but you encounter an “Unknown Resource” error, this is probably the easiest fix (but we recommend you consider Methods 2 and 3 below). The reason the “Unknown Resource” error occurs is probably because you have a resource specified through code somewhere in your experiment (take for example the “stim{N}.png”.format(thisNumber) case).
You can manually specify what resources your experiment will need when you Configure the online settings of your experiment. However, if you have a large number of files, we recommend you either Specify the files to download at the start using the Resource Manager Component or Specify the files to download each trial using Static Component.
Specify the files to download at the start
(added version 2022.1.0)
Example use case: fetch a whole set of movies, possibly a custom list, for the participant while they read your instructions (i.e. within the experiment rather than at the start). You can start them loading before the first instructions screen and then make sure they have all downloaded before the trials actually begin. You could even load yor files in two sets - download a few files during instructions and then fetch the rest during practice trials!
While the automatic method is easy, it suffers if you have lots of resources (the participant sits waiting on that dialog box while the resources are fetched) or if each participant uses only a subset of resources. PsychoPy has a new Component called the Resource Manager Component that allows you to specify the files you need and the time you want them to start and/or confirm downloading.
Warning
If you use this method you do then need to list ALL of the files you want to download. PsychoPy won’t do a combination of automatically fetching files as well as letting you specify them.
Specify the files to download each trial
(added version 2022.1.0)
Example use case: Fetch the image file during the fixation period on each trial.
If each resource can be retrieved relatively quickly (e.g. an imagefile over a broadband connection) then you might want to fetch the stimulus on each trial. This has the advantage that you don’t need to prespecify anything and you could even choose the stimulus to download dynamically, based on the previous response!
The other nice thing about this method is that it can be used either using a Resource Manager Component Component, or by simply setting the stmulus to update using a Static Component where that Static Component lasts during your fixation period.
Warning
If you request a file and it takes too long to arrive then the onset of the trial will occur at a different time. PsychoPy will pause and will take this in to account in its response times etc. but if you absolutely must have the stimulus appear at very regular times then you should make sure you download your stimuli a long way in advance (as above) or with a very generous time window to allow for slower connections.
Media formats suitable for online studies
When you want to present images, sounds, or movies online, two things are important to take into account:
Web-browsers may support different formats than PsychoPy does
Because all media need to be downloaded via internet, it can be handy to use formats that compress your media, so that they produce smaller files.
Below are some recommended formats and pointers how to convert your media with free and open source software.
Images: PNG or JPG
Web-browsers support a large variety of image formats; see an overview here. Two widely supported formats are:
PNG. This format applies “lossless” compression, which means that the compressed image is an exact reproduction of the original image. PNG is good at compressing pictures with geometric shapes, but natural scenes may yield relatively large files.
JPG. This format applies “lossy” compression, which means that the compressed image approximates the original image. JPG can compress natural scenes very well. When encoding to JPG, you can adjust quality settings to produce larger (and more detailed) or smaller (and less detailed) files.
For converting images to PNG and JPG, you could use GIMP. See this tutorial about GIMP for instructions on how to convert multiple images at once using GIMP. By picking “Change Format and Compression” in step 4 of the tutorial you can select which format to save the images in.
Sounds: MP3
Here you can find an overview of audio formats supported by web browsers. MP3 is the most widely supported format. MP3 performs lossy compression, so the sound may lose some detail, but you can adjust the quality level. At higher qualities, the loss in detail is negligible.
For converting sound to MP3, you could use VLC Player. See this tutorial about VLC for instructions on how to convert multiple sounds at once using VLC.
NB - Presently, PsychoPy does not yet support MP3.
Movies: MP4 + H.264 & MP3
Here you can find an overview of video formats supported by web browsers. MP4 + H.264 + MP3 is the most widely supported format.
MP4 is a format that can contain video and audio
H.264 is a format that encodes video
MP3 is format that encodes audio
Both H.264 and MP3 perform lossy compression, so the video and audio may lose some detail, but you can adjust the quality level. At higher qualities, the loss in detail is negligible.
For converting movies, you could use VLC Player. See this tutorial for instructions on how to convert multiple movies at once using VLC. To set up the output format correctly, we recommend making a new profile at step 4 in the tutorial above (see Fig. 22):
Click the “New Profile” icon, then pick a name for your profile.
In the “Encapsulation” tab, select “MP4/MOV”
In the “Video codec” tab:
Tick “Video” checkbox
Select “H-264” as “Codec”
Higher bitrates mean video that is of higher quality, but also larger files. Here are some bitrate guidelines
In the “Audio codec” tab:
Tick the “Audio” checkbox
Select “MP3” as “Codec”
Higher bitrates mean audio that is of higher quality, but also larger files.
For Sample Rate, 44100 Hz is a good choice
Finally, save your profile by clicking the “Create” button.
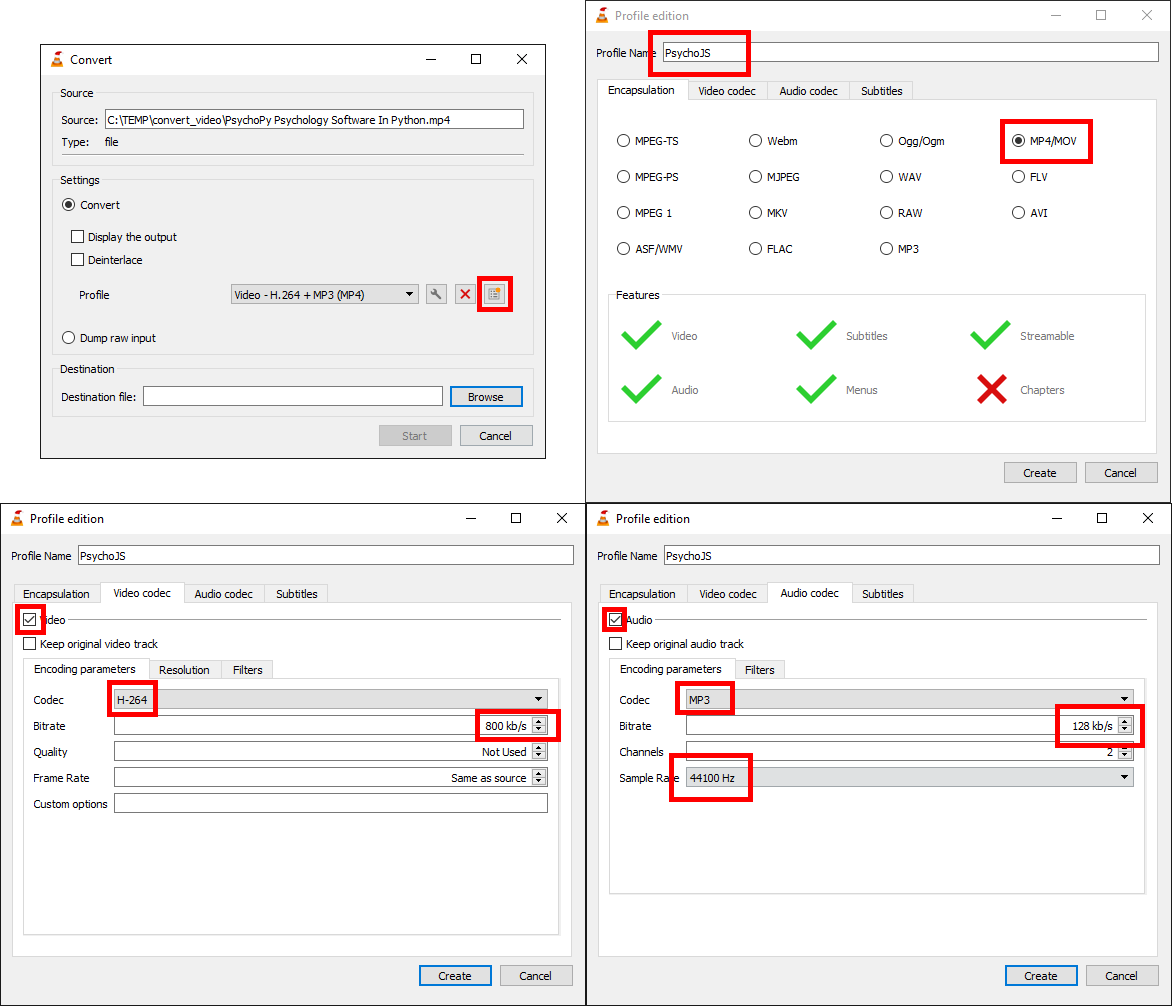
Fig. 22 Profile settings for encoding video to MP4 + H.264 & MP3