
Sending triggers via EGI NetStation
Communicating via EGI NetStation is very similar to communicating via a serial port, in that you’ll need to add some code components into your experiment.
The egi-pynetstation package allows communication using an NTP protocol. It is important to first verify your hardware setup. The code is compatible with EGI (also known as Philips EGI and most recently MagStim-EGI) amplifiers 300 and 400 series. While 400 series amplifiers serve as their own NTP server so are able to work with newer macOS versions (10.14.x as of April 2023). If you are using a 300-series amplifier you must be using macOS 10.12. This is because EGI has configured its own NTP server for use with 300-series amps; users who wish to alter this configuration with a 300-series amp should continue to use PsychoPy2’s EGI package or investigate ports of the old package to Python3.
The old EGI “pynetstation” package uses a “polling” method of asking the EGI system what time it is before sending events. While generally accurate, delays in drawing to the screen can cause (usually minor) inconsistencies in timing. This pakcage’s implementation of NTP timing should be superior to the older method.
Step one: Verify your Amplifier and NTP server are active
Users of 300 series amplifiers should open a terminal and run the following command: sntp -d localhost
Users of 400 series amplifiers may input the IP of your amplifier (usually 10.10.10.51) in the command above or open the webpage associated with the amplifier on the EGI laptop/desktop.
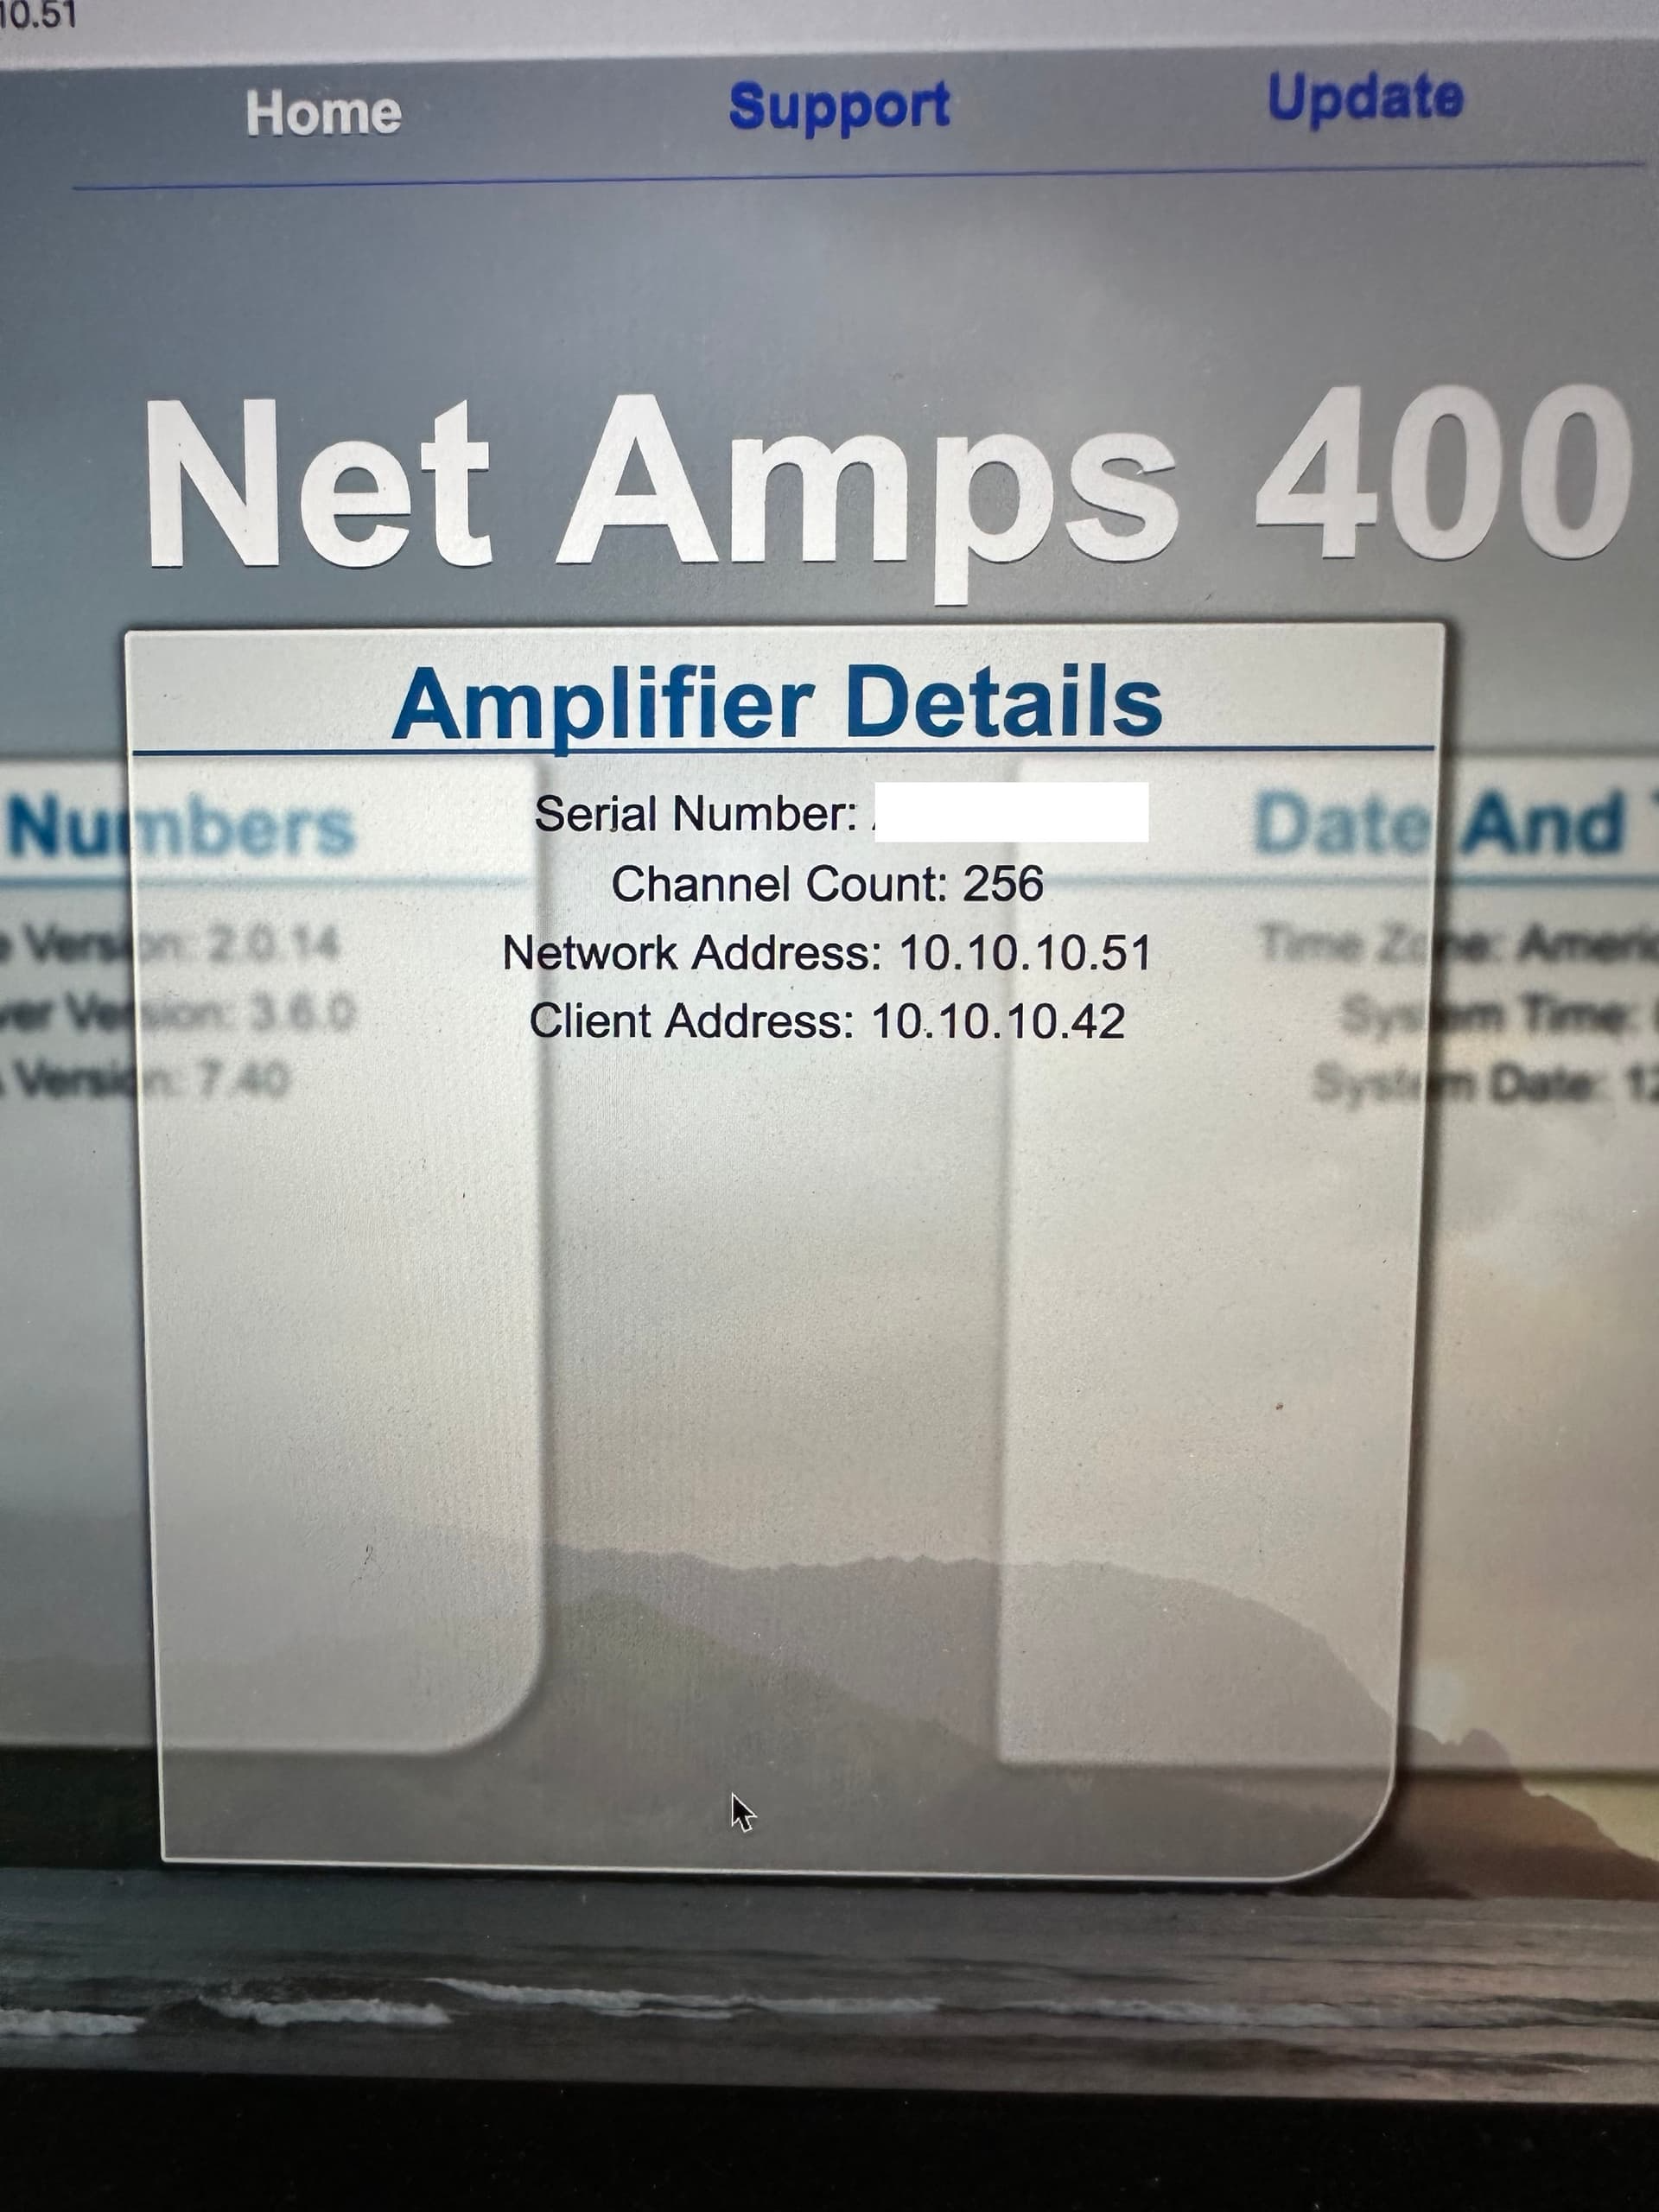
Notice that this page gives information about your amplifier address (10.10.10.51) and the Net Station computer (10.10.10.42).
Step two: Install EGI NetStation Python Library on older versions of PsychoPy
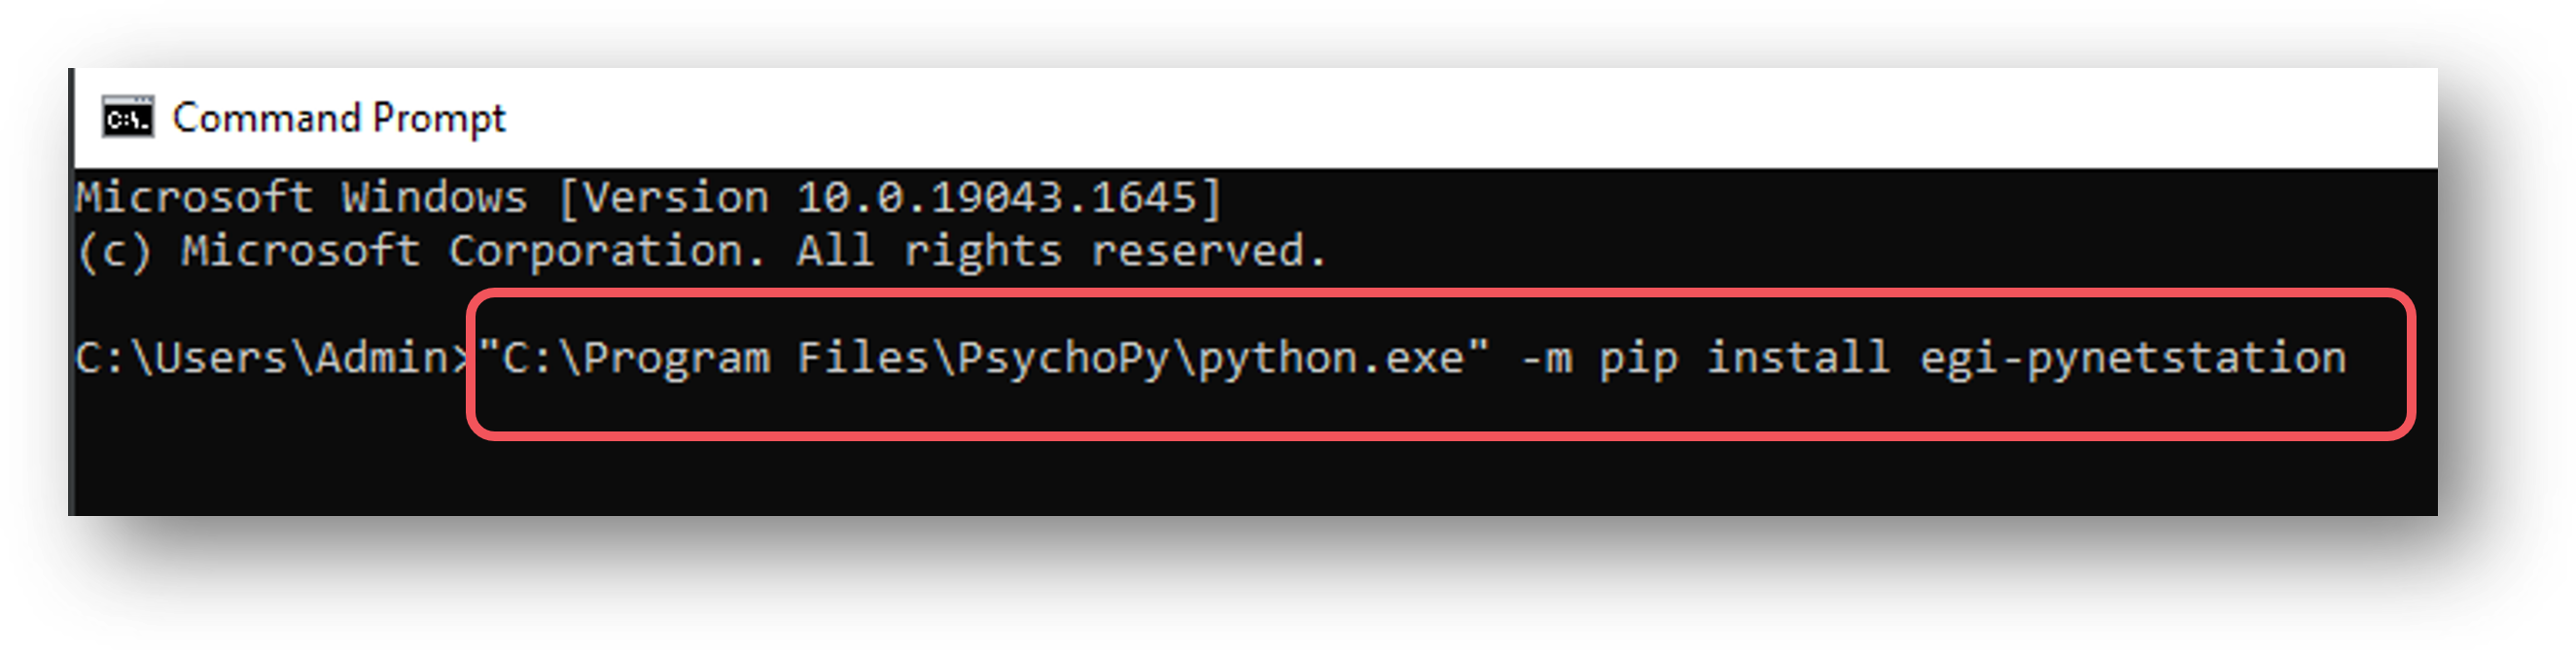
If you’re using PsychoPy version 2022.1.3 or older, you’ll need to install the EGI NetStation library using the Command Prompt in Windows. You will only need to do this once.
To access the Command Prompt, just type Command Prompt `into the search bar next to your `Start Menu icon and select it.
You now need to copy the file path to the file python.exe that is inside your PsychoPy folder (usually this is installed in
C:\Program Files\PsychoPy).When you’ve found the PsychoPy folder, copy the file path and paste it into the Command Prompt, surrounded by quotation marks (” “).
Now, add
\python.exeto the line, so that the line reads:"C:\Program Files\PsychoPy\python.exe"(or similar, depending on where your PsychoPy is saved).Finally, add
-m pip install egi-pynetstationto the line.Your line should now look similar to this:
"C:\Program Files\PsychoPy\python.exe" -m pip install egi-pynetstationas shown in the following screenshot:
You’re now ready to go!
Step three: Verify / Update the egi-pynetstation package to 1.0.1
If you are using Psychopy versions from 2023 or later, please verify that you are using version 1.0.1 of the package the PsychoPy package manager update the package.
From the menu system, select Tools, Plugin/Package manager
Select the “Packages” tab
Search for “egi_pynetstation”
Verify the installed version is 1.0.1
If necessary, click the “Install” button
Step four: Add code components into your Builder experiment
To communicate with your NetStation EEG hardware, you’ll need to add in some Python code components to your experiment.
First, add in a code component to your Instructions routine (or something similar, at the start of your experiment):

Fig. 39 Select the Code component from the Custom component drop-down
In the Begin Experiment tab, copy and paste the following code which will import the relevant libraries and set up the communication with your NetStation - be sure to change the IP address of the NetStation so that it matches that of your own NetStation:
#Import Netstation library
from egi_pynetstation.NetStation import NetStation

#IP address of NetStation - CHANGE THIS TO MATCH THE IP ADDRESS OF YOUR NETSTATION
IP_ns = '10.10.10.42'

#IP address of amplifier (if using 300
#series, this is the same as the IP address of
#NetStation. If using newer series, the amplifier
#has its own IP address)
IP_amp = '10.10.10.51'

#Port configured for ECI in NetStation - CHANGE THIS IF NEEDED
port_ns = 55513

#Start recording and send trigger to show this
eci_client = NetStation(IP_ns, port_ns)
eci_client.connect(ntp_ip = IP_amp)
eci_client.begin_rec()
eci_client.send_event(event_type = 'STRT', start = 0.0)
Now, copy and paste the following code component to your trials routine in the Begin Routine tab, this just (re)sets a value at the start of the routine to indicate that no trigger has yet been sent:
triggerSent = False
eci_client.resync()
Now, in the Each Frame tab of that same code component, add the following code to send a trigger OF NO MORE THAN FOUR CHARACTERS when your stimulus is presented. The
.statusattribute here is checking whether the our stimulus has started, and if it has, PsychoPy sends the trigger to EGI NetStation. Note that most components in PsychoPy have the.statusattribute, so you could easily adapt this code to, for example, send a trigger when a response key is pressed:#Send trigger to NetStation - Change 'stim' to #a meaningful trigger for your experiment OF NO MORE THAN FOUR CHARACTERS. You can #also set the trigger in a conditions file. if stimulus.status == STARTED and not triggerSent: #If the stimulus component has started and the trigger has not yet been sent. Change 'stimulus' to match the name of the component you want the trigger to be sent at the same time as win.callOnFlip(eci_client.send_event, event_type = 'stim', label='stim') #Send the trigger, synced to the screen refresh triggerSent = True #The trigger has now been sent, so we set this to true to avoid a trigger being sent on each frame
Finally, in a routine at the end of your experiment (the Thanks for participating screen for example) copy and paste the following:
#Stop recording and disconnect
eci_client.end_rec()
eci_client.disconnect()
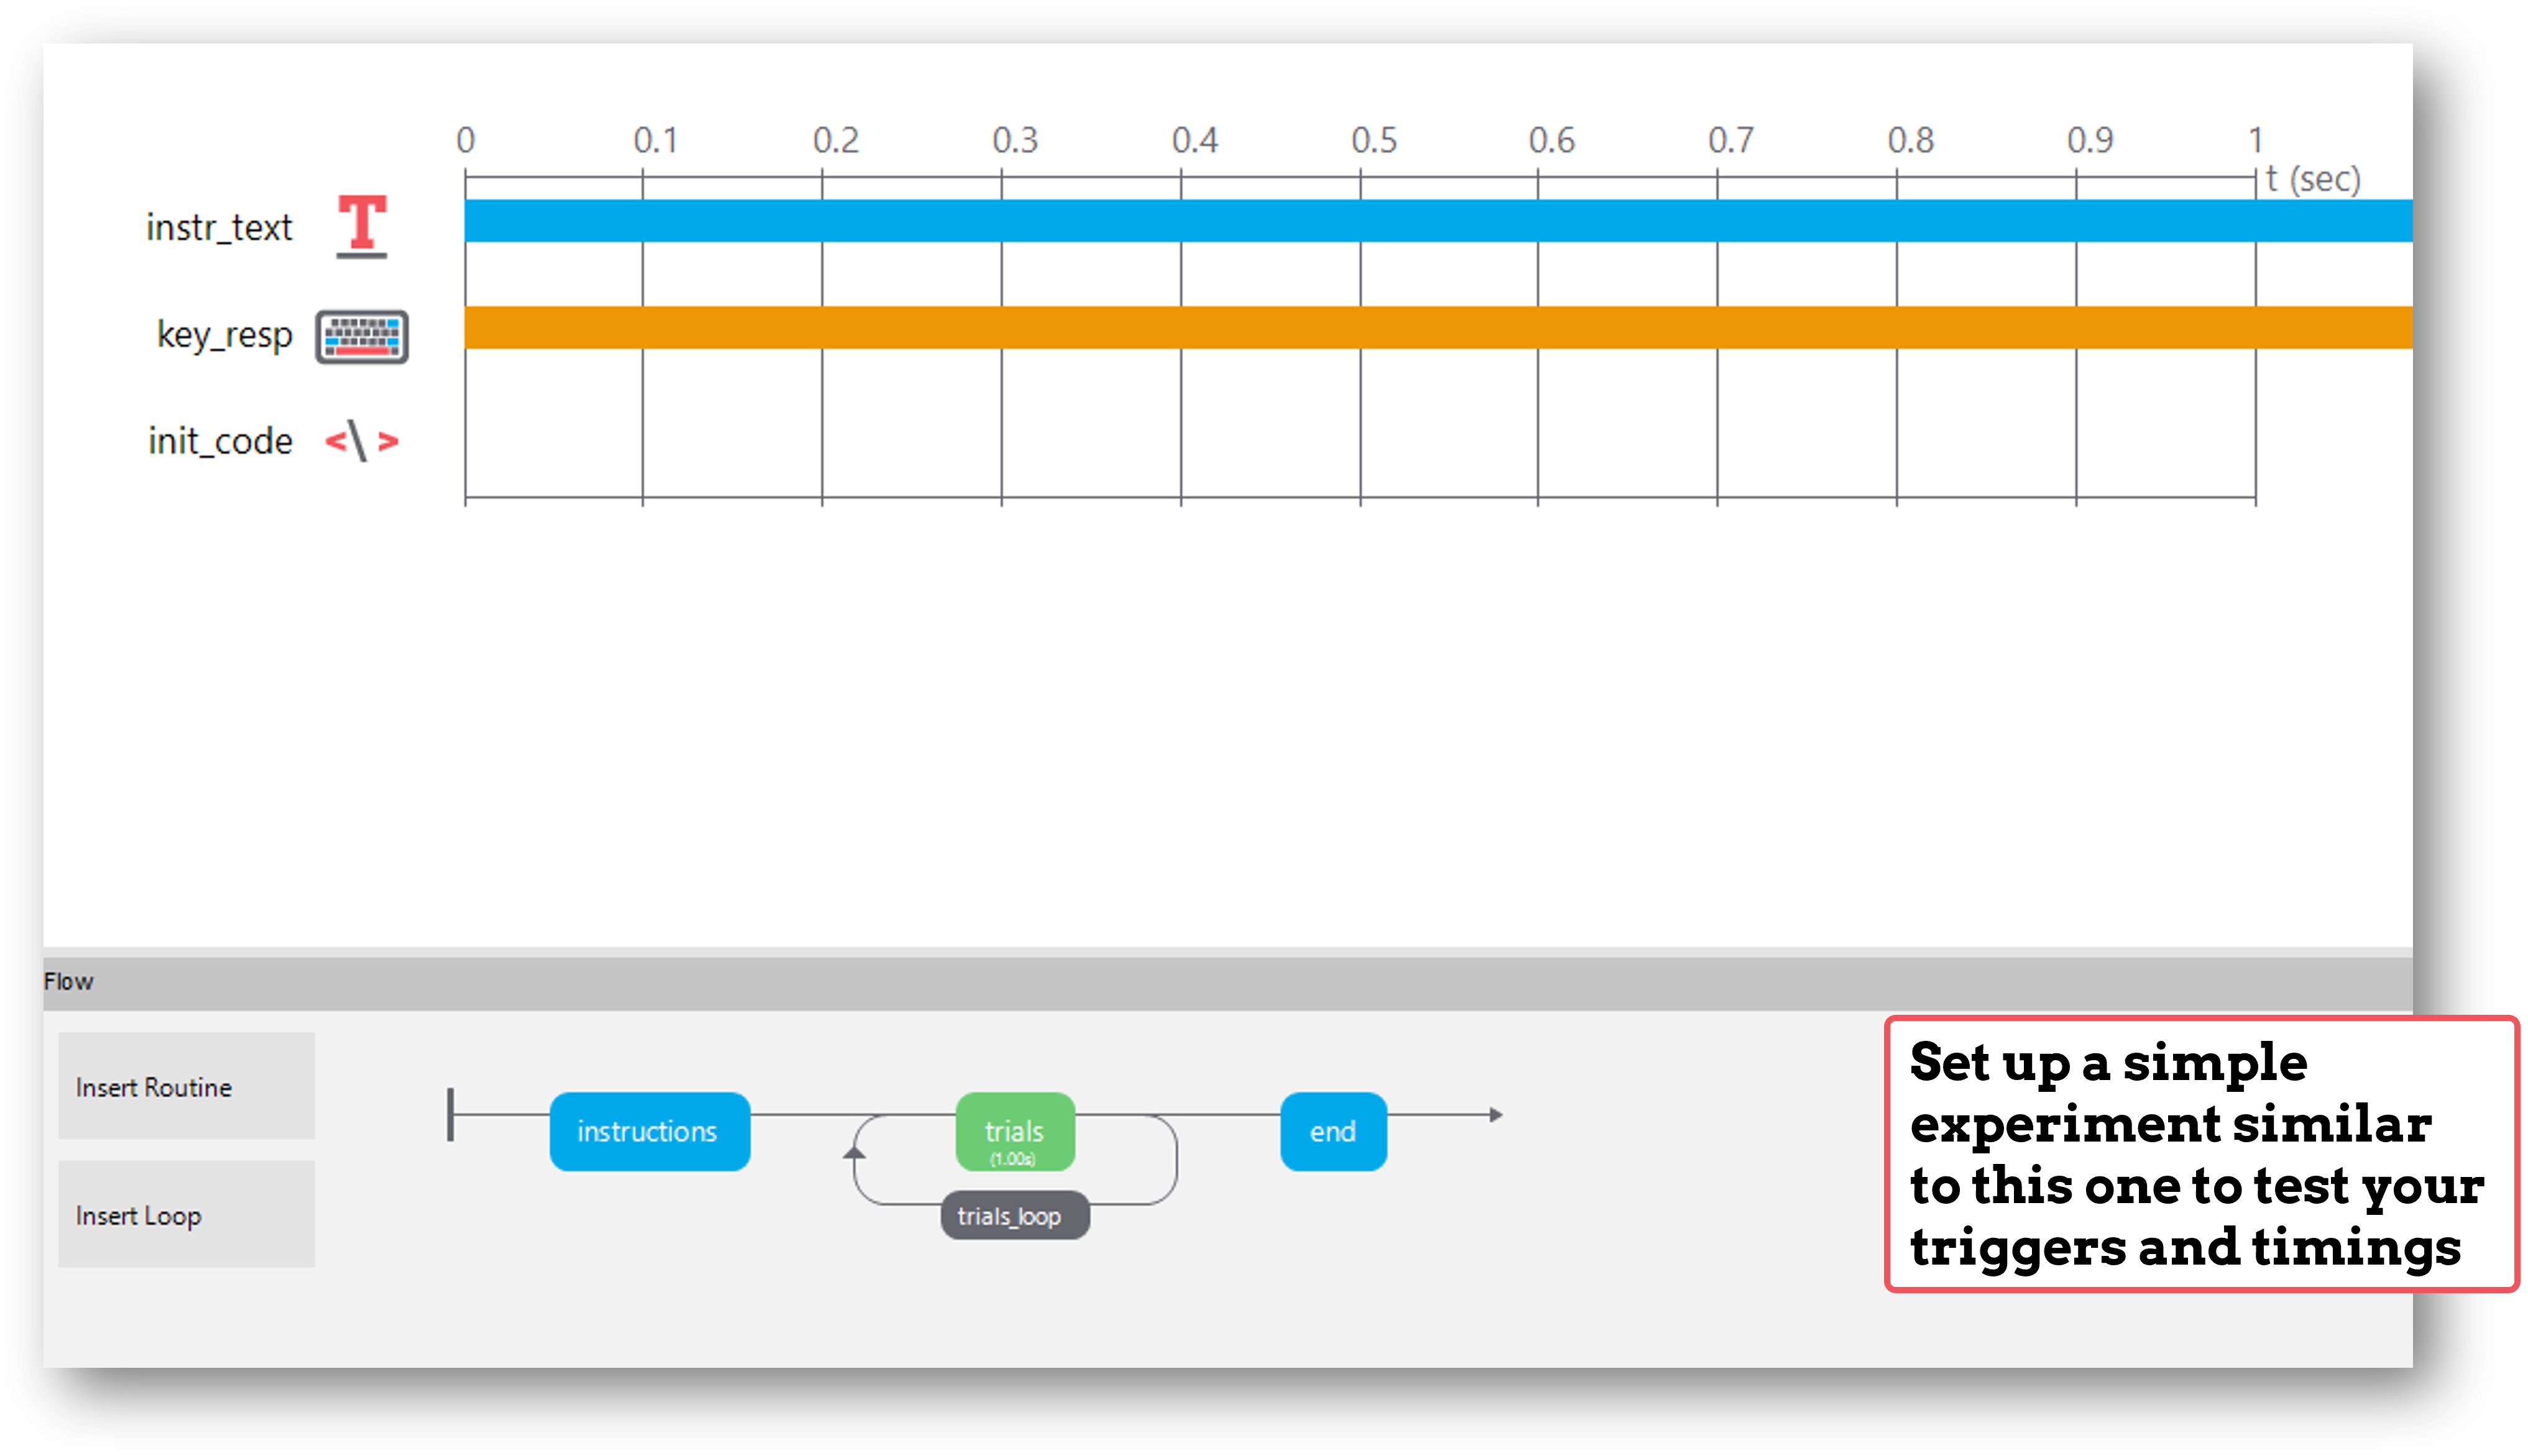
Step five: Test your triggers
To check that everything works, we recommend that you set up a very basic experiment that looks similar to this:
Turn on your EEG recording device and start recording as you would in your actual experiment, and just check that you see triggers coming through.
It’s a good idea at this point to also check the timing of your stimulus presentation and your triggers using, for example, a photodiode for visual stimuli.
Doing these checks with a very basic experiment just means that you don’t accidentally change something on your real experiment file that you don’t want to, and also means you don’t have to disable components or sit through lots of instructions etc!
See Built-in Example: Stroop Task
There is a complete experiment built into PsychoPy demonstrating EEG triggers to the EGI amplifier.
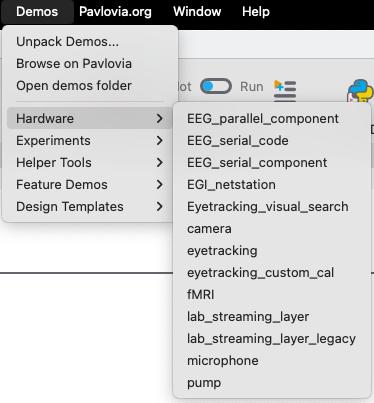
To access the demo:
Select “Demos” menu
If not previously done, select “Unpack Demos”
Select the “Demos” menu again, click “Hardware”, select “EGI_netstation”
This built-in demo should run and send appropriate triggers to the EGI amplifier/computer
If there is a problem - We want to know!
If you have followed the steps above and are having an issue with triggers, please post details of this on the PsychoPy Forum.
Further documentation can be found on the egi-pynetstation RTD as well as their github project .
We are constantly looking to update our documentation so that it’s easy for you to use PsychoPy in the way that you want to. Posting in our forum allows us to see what issues users are having, offer solutions, and to update our documentation to hopefully prevent those issues from occurring again!